iTop 0.9
Administrator guide

Don’t hesitate to ask question
to support@combodo.com
Table
of content
Configuring short list display
Configuring size of document upload
Migrating from previous version 0.8
Integrating with other application
How to export data out of iTop
This
document describes release 0.9 of iTop. iTop is a robust Open Source web 2.0
application that will help you to better support your IT. Development of iTop
started in March 2006 in order to publish on the internet a completely open
solution that would help enterprise to drive ITIL best practices
implementation. Goal of the iTop community was to provide an alternative solution
to very expensive solutions sold by standard software vendors.
At the
early beginning of the project, the development team was focus on building the
most complete CMDB (Configuration Management Data Base). One key objective was
to make it as flexible as flexible in order to allow administrator to add and
remove configuration items from the data model and manage as many relationships
as they want. The development team also designed a powerful state machine that
allows defining life cycle for whatever configuration items in the CMDB.
Realizing
that all concepts developed within the CMDB can be applied to all other ITIL
best practices, the iTop community decided to extend them to Incident
Management, Change Management and Service Management modules. Then iTop became an
IT operational portal that helps all IT management team to support their
environment by:
Documenting IT infrastructures and their
relationships (servers, application, network …)
Documenting IT incident and planned outages, as
well as a known error database
Documenting all IT services and contracts with
external providers
iTop
application can be used by different type of profiles:
Help Desk
IT support engineers (1st level, 2nd
level, 3rd level …)
IT service managers
IT managers
iTop
application is relying on Apache, MySQL and PHP, so it can run on whatever
operating system supporting those applications. It had been tested already on
Windows, Linux Debian and Redhat. As it is a web based application you don’t
need to install client on user PC. A simple web browser is enough to use it.
iTop is licensed under the
terms of the GNU
General Public License Version 3 as published by the
Free Software Foundation. This gives you legal
permission to copy, distribute and/or modify iTop under certain conditions.
Read the ’license.txt’ file in the iTop distribution.
iTop is provided AS IS with
NO WARRANTY OF ANY KIND, INCLUDING THE WARRANTY OF DESIGN, MERCHANTABILITY, AND
FITNESS FOR A PARTICULAR PURPOSE.
Goal of
this release was to make the application more robust and more professional. To
achieve these goals we developed new features that are mandatory for such
application and we fixed a large number of bugs. Just remember that some of the
improvement depends on the new data model provided with release 0.9. So if you
keep former one, you may have some bugs not fixed. We also underline the fact
that the new data model is not compatible with the one you currently have. So
we recommend you to check “Migration” chapter in Administrator guide to use the best practice to migrate.
New features
This version introduces the capability to
generate fully customizable eMail notifications.
This is achieved via two new type of objects:
triggers and actions. Triggers define when
a particular notification must be sent. Actions
define the recipients of the notification
as well as the content of the eMail message.
Have a look at the "Notifications"
menu item (admins only) for how to configure the notifications.
Note that the notifications shipped by default
with the application have been set to 'disabled' so that no
email get sent out in case you load the sample
data that contains several tickets.
To enable them go to the "Admin" menu
"Notifications", then in the tab "Actions" open the action
that you want to enable and modify its status
to "production".
Documents:
The "document" object now contains a
field to upload binary documents. The application
automatically keeps track of the history of the
document (i.e. each version is recorded in the database).
Such documents are stored as "blobs"
in the database.
Some type of documents can be displayed online
directly (images, HTML, PDF...) some others
can only be opened in a new window, or saved to
the user's disk.
SOAP Web service:
This release introduces a formal SOAP web
service to create an incident ticket.
The WSDL describing this web service is located
at: http://<your_server_and_port/webservices/itop.wsdl.php
Right now the web service has been tested using
a PHP client and the Eclipse/Java web services tester.
We are planning to add more capabilities to the
web service in the next releases.
Check the PHP client example available with
this release in: /webservices/itop.soap.examples.php
Truncated lists:
When the result of a query returns a long
(limit is configurable) list of objects,
the display is truncated to speed up the whole
display, with a link to open the full list.
Bug fixed
All our
bugs are track on sourceforge: http://sourceforge.net/apps/trac/itop/report/1.
This current release is fixing 11 critical bugs:
#15 major enhancement Manage documents
#17 major enhancement User right management UI
#28 major defect Import
CSV failing
#29 major defect Search
in object details page
#31 major defect Wrong
HTML display in export CGI
#38 major defect Content
of Tabs not displayed on Reload
#42 major defect Issue
with IE6 and IE7
#48 major defect Change
tracking for user object class wrong
#52 major defect issue
when displaying details for lnkInfraError object
#53 major defect Global
search always displays organizations
#58 major defect issue
with HTML format in export.php
#59 major defect Modification
of an object with an external key fails
#60 major defect Modification
of Service Calls does not work on IE
#65 major defect Incorrect
handling of localized characters (like accented characters é à, etc.)
#67 major defect Misleading
message when Flash is not installed
#43 minor defect Enter/Cancel
keypress closes the dialog
#44 minor defect Mandatory
field without option - various symptoms
#49 minor defect Grant
matrix not reflecting changes in the user profile
#62 minor defect Could
not create new object Person in a bulk load
#47 minor enhancement Split is deprecated.
Release 0.9
is not supporting:
- Creation of new user profile.
- Delete All functionality for a
list of object.
- Cloning an existing device.
This feature has been disabled for the moment
- as it was not working properly.
- Update All for n/n
relationships.
- A lifecycle is not defined for
all CI. Only for incident tickets and change tickets.
- Localized characters (like
accented letters) are not supported for the moment in eMail notifications
Software
requirement
iTop is
based on the AMP (Apache / MySQL / PHP) platform and requires PHP 5.2 and
MySQL 5.
Getting
required software on Debian:
Apt-get install apache
Apt-get install mysql
Apt-get install php
Getting
required software on Redhat:
Yum install apache
Yum install mysql
Yum install php
Download
iTop package
Latest
version of iTop is release 0.9 You can download it on source forge:
wget http://sourceforge.net/projects/itop/files/itop/0.9/iTop-V0.9.zip/download
You can
also browse source forge web site to view all release:
http://sourceforge.net/projects/itop/files/
Install
iTop
- Make sure that you have a
properly configured instance of Apache/PHP running
- Unpack the files contained in
the zipped package in a directory served by your web server.
- Point your web browser to the
URL corresponding to the directory were the files have been unpackaged and
follow the indications on the screen.
For instance http://myserver,
or http://myserver/itop/ if you have
created a dedicated alias for iTop application
As a matter
of fact, iTop package provides a step by step wizard to install the
application.
First step
is checking all prerequisites for MySQL and PHP, and lets you enter information
to access the MySQL database (server, user and password). MySQL user needs to
have root privileges.
The data
base can be installed either on the same server or can be a remote host if you
prefer to have a two tier architecture, or reuse an already installed instance
of MySQL.
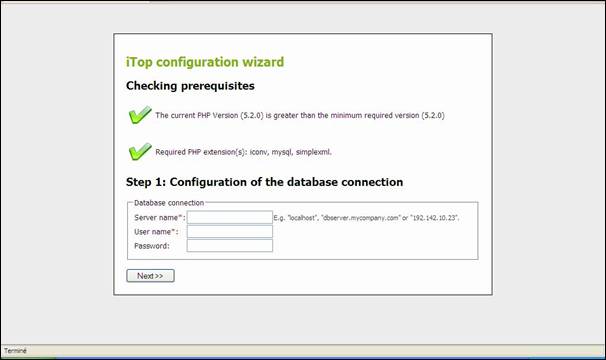
Figure 1
Second step
lets you create the database for iTop. You can either choose an existing one,
or create a new one.
You can
also decide to prefix all iTop tables with a given name. This is useful when
you want to run several instances of iTop with the same data base.
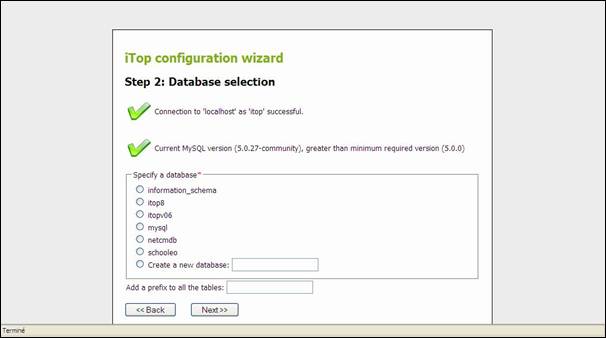
Figure 2
Third step
lets you define administrator login for accessing the application. Don’t forget
user login and password, as they are required to access the application.

Figure 3
Forth step
lets you decide if you want to create sample data for testing purposes. This is
very useful first time you install iTop. If you select “No”, database will be
empty and you will have to load data by yourself.
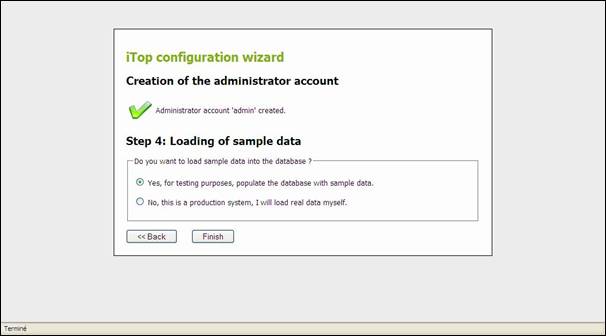
Figure 4
Congratulation,
installation is successful and you just have to play with iTop now !
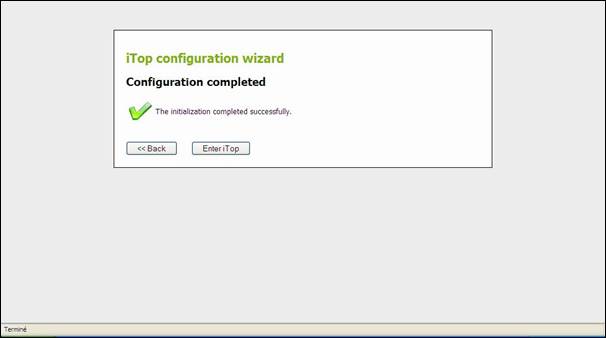
Figure 5
Changing
configuration option
Configuring
short list display
Short lists
are used to limit number of item displayed in a list when it is too long. By
default a short list is displayed as soon as there are more than 15 objects.
This value can be changed by modifying “max_display_limit”
in config-itop.php.
The number
of object displayed in a short list is defined by another variable in
config-itop.php “min_display_limit”.
Be careful to not set a too high value.
Configuring
size of document upload
The maximum
size of document you can upload is limited by “upload_max_filesize” in php.ini and “max_allowed_packet” in mysql.conf. This
latest value has to be a little bit biger than upload_max_filesize. During installation, setup script checks both
variables and raise warning in case there is an issue.
If you want
to change the maximum size of document you have to modify both and make sure
they are coherent.
Once done
you have to restart your web server and mysql.
The release
0.9 data model is not compatible with former one. So you may encounter
inconsistency issue between this one and your current database.
In order to
migrate, you have two options:
·
Either
you keep your current data model and so won’t get benefits from new one.
·
Or
you export your current data in csv files, in order to re-import them later in
your new installation of release 0.9
Keeping
0.8 data model.
If you
choose this option, just unpack from tar installation all directories except
“business” at the root of your previous installation.
Exporting
& re-importing data
If you
choose this option, you have to use export function for each type of objects,
in order to save your data in csv files. Once done, you can install new release
0.8 using a new database. Once done, you can re-import you object using “csv
import” functionality. Be careful, you need to make sure that attributes for
your objects are still valid, and you need also to check pre defined values are
still the same for enumerated list. For that compare former data model with new
one for each type of object. For this, you should look at “viewing data model”
chapter in this documentation.
In case you
encounter issues, you can ask support at support@combodo.com
Starting
iTop
To use iTop,
you just need a simple web browser and enter the following URL:
http://yourserver
or http://yourserver/<itop alias>
if you have created a particular apache alias for the application.
User is
prompt to enter his login and password.
Figure 6
Depending
on its profile, the user has more or right to use the application, but this
topic will be discussed later in “User Management” chapter.
Once
authenticated, the user accesses the main iTop page.
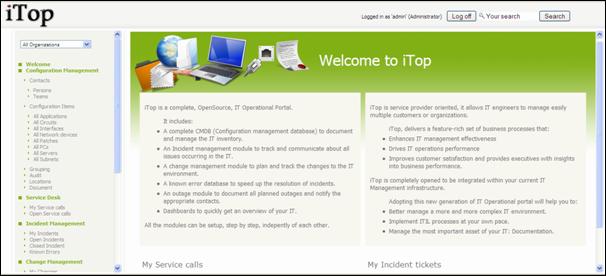
Figure 7
This main
page is divided in three parts:
·
Left
menu (also called explorer menu) to
access item from each module (CMDB, Incidents, Changes, Services and contracts)
·
Main
frame on the right displays list of items from selected module, or details for
a given item.
·
Top
frame to use global search function, and display login information
Managing
users
ITop
provides a user management module allowing you to assign users with one or
several predefined profiles. Thus you can restrict access to you operational
portal, and allow user to modify only objects they are allowed to. You can also
define action they are allowed to perform. For instance, a change approver is
not allowed to create a change, but just approves it.
In the
current version, profiles are predefined, so their modification requires
assistance of an iTop consultant.
Viewing
Profiles
Under
“Admin Tools” menu you can use profile sub-menu to access those profiles, and
see corresponding responsibilities. Following window appears:
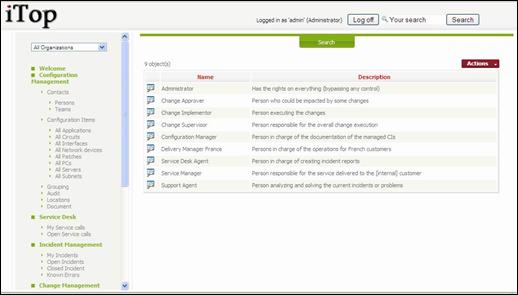
Figure 8
When you
click on ![]() button you get details for selected profile.
button you get details for selected profile.
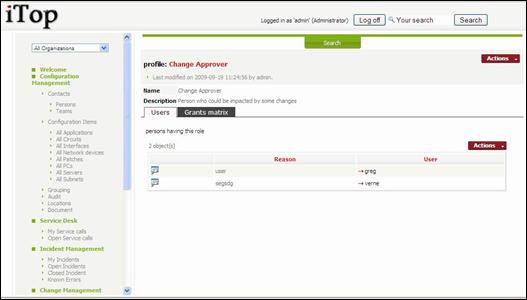
Figure 9
The tab
“Users” list all users having this profile.
The tab
“Grant matrix” displays all objects and actions allowed for this profile.
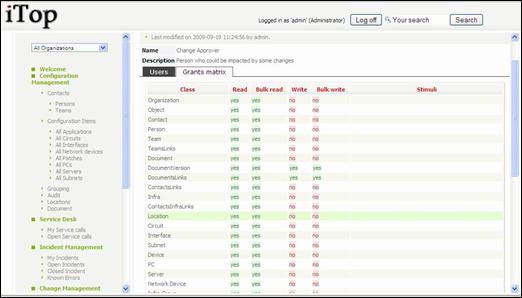
Figure 10
Viewing
users
The menu
“User logins” under “Admin Tools” one, allows you to see all logins defined for
you iTop instance.

Figure 11
When you
click on ![]() button you get details for selected login.
button you get details for selected login.

Figure 12
A user
login is always linked to a contact stored in the CMDB (See Using CMDB module
in iTop user guide). Prior to create a login you have to make sure that the
user is documented as a contact in the CMDB.
The tab
“Profiles” list all profiles that are linked to this user.
The tab
“Grants matrix” display rights allowed for this user. It is the merge of all
rights corresponding to associated profiles.
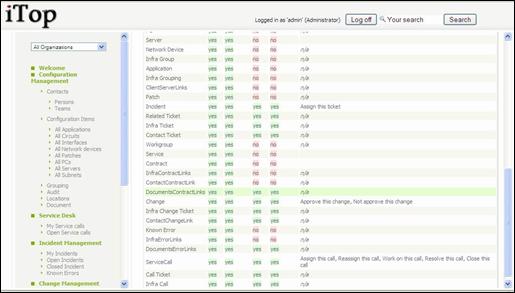
Figure 13
Creating
a user
To create a
new user you just have to click on “New” in action drop down list, from either
user list or a given user detail. Following wizard then appears:
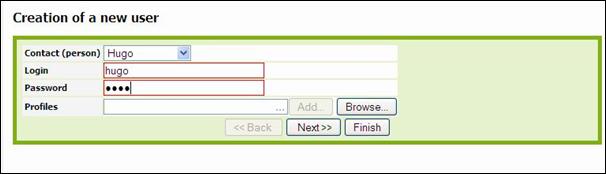
Figure 14
To add
profiles to this user you can either fill the profiles field if you know the
profile and click on ![]() ,
or click on button
,
or click on button ![]() .
In the second case, you will use following wizard to select profiles you want to
assign to user
.
In the second case, you will use following wizard to select profiles you want to
assign to user
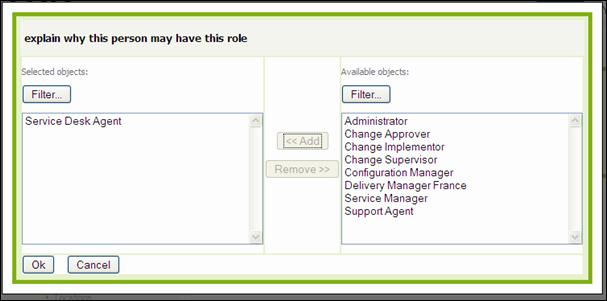
Figure 15
Once
profiles are added to the user, click on ![]() .
A confirmation window appears. Click on
.
A confirmation window appears. Click on ![]() to validate creation of this new user.
to validate creation of this new user.
Updating
user profile
You can add
or remove permissions to a user by managing profiles he is linked to. Use ![]() button on top right corner of a list of
profiles assigned to a user. Use “Add” to add a new profile, or “Manage” to
modify or remove one.
button on top right corner of a list of
profiles assigned to a user. Use “Add” to add a new profile, or “Manage” to
modify or remove one.
When you
click on “Manage”, following wizard appear:
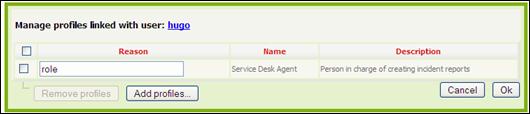
Figure 16
You can
change the reason why the user has this profile, or Remove this profile. Be
careful, make sure the user has at least one profile.
If you
click on “Add profiles”, following wizard appears. It is the same has the one
you get when you click on “Add” in ![]() button list.
button list.
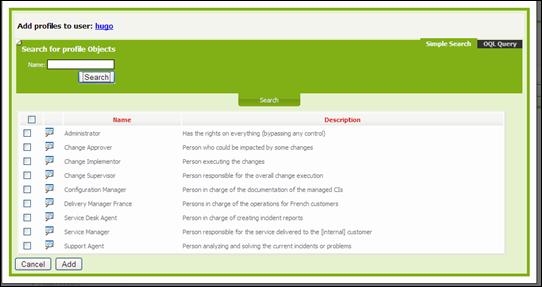
Figure 17
Use the ![]() button to look for profiles, select the ones
you want to assign to user, and click on
button to look for profiles, select the ones
you want to assign to user, and click on ![]() .
Profiles are then assigned to user.
.
Profiles are then assigned to user.
Managing
Organization
Organizations
are used in iTop to group object into silos. Only administrators can add or
remove organizations.
Adding
an organization
To add an
organization, you have to click on “Universal
search” menu. It displays the list
of existing organization.
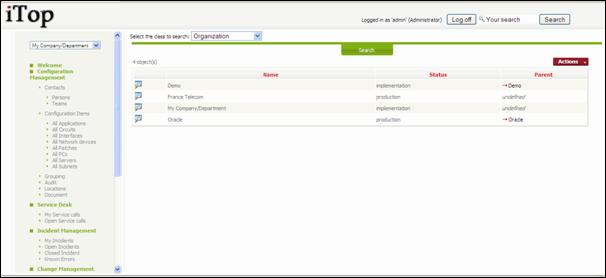
Figure 18
Then click
on ![]() and select New.
You just have then to fill following form
and select New.
You just have then to fill following form
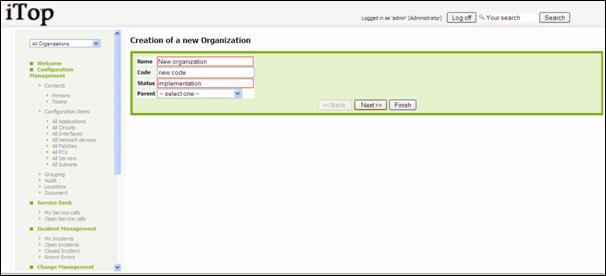
Figure 19
Updating
an organization
To add an
organization, you have to click on “Universal
search” menu. It displays the list
of existing organization.
Figure 20
Click on ![]() to see details for selected organization. You
can then click on
to see details for selected organization. You
can then click on ![]() and Modify
to change values for organization’s attributes.
and Modify
to change values for organization’s attributes.
Managing
Notification
In this new
release of iTop, a notification system is integrated with life cycle of any
object if exist. This allows you to define e-mail notification rules when a
given class of object enter or leave a given state, or when we create a new
object.
The
notification mechanism is divided in two parts:
- Triggers that define when mail
notification is executed and for which type of object
- Action that define how the mail
is formatted
You can
like several actions to a given trigger. The same action can be linked to
several trigger.
The menu
“Notification” displays following window:
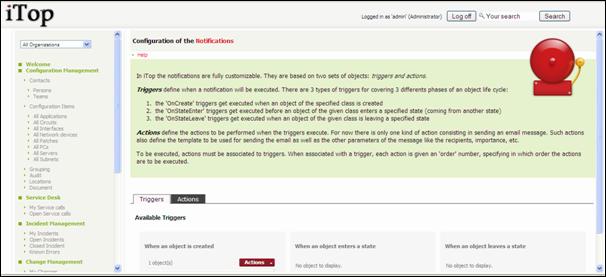
Figure 21
The
“triggers” tab displays all created triggers, and the “Actions” tab displays
all Actions
Creating
an action
Before
creating a trigger, you need to define at least one action. It is a kind of
template for formatting e-mail to be sent.
To create a
new action, go to action tab and click on “New” in action drop down list. The
following wizard appears:
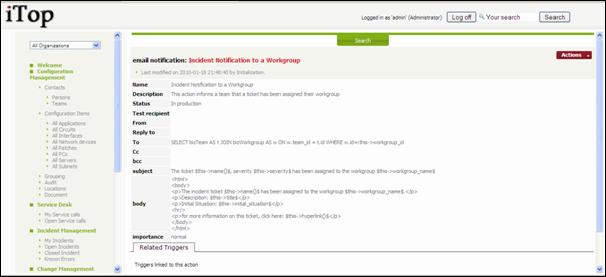
Figure 22
You have to
define at least a from e-mail address, and define to whom you want to send
mail. The from e-mail address has to be a valid one, else your smtp server will
refuse it.
In To”,
“Cc”, and “Bcc” field you can use OQL query to define a list of target e-mail.
This list as to return a list of object containing an e-mail attribute:
- Contact
- Person
- Team
For
instance To: SELECT bizPerson WHERE name LIKE ‘John’
If the
return list is empty no mail is sent.
The subject
field is as well mandatory.
The body is
the text sent. It can use HTML tag for formatting. You can also use attributes
of the object that will trigger the action. The syntax to be used is $this->attribute$.
There is as
well to specific attributes:
$this->name()$ is the name of the concern
object
$this->hyperlink()$ is a url to access the
concern object
By Default
importance of the mail is “normal”.
The 0.9
release provides 3 actions, but you have to update from field with a valid
e-mail address.
To test a
new action, you can use the status “Being tested” and “Test recipient” with a
test address. In that notification will be sent to this later address. Once
validated don’t forget to change the status to “In Production”.
If you want
to de-activate an action, just set the status to “Inactive”.
Creating
a trigger
Once you
have actions defined, you can create triggers. You can define three types of
triggers:
- When a new object is created
- When an object enter in a given
state
- When an object leave a given
state
To create a
new trigger, click on “New” in action drop down list for the given category in
“Trigger” tab. The following wizard open:
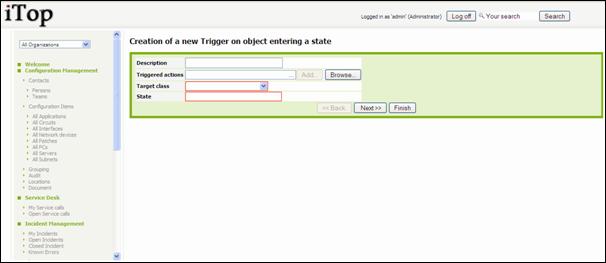
Figure 23
For each
trigger you have to define the class of object to which this trigger is
applicable and the concern state.
Then you have
to select associated actions using “browse” button.
![]() We strongly encourage you to test triggers and
actions before moving them to production. As a matter of fact, it is always
difficult to understand why e-mails are not sent.
We strongly encourage you to test triggers and
actions before moving them to production. As a matter of fact, it is always
difficult to understand why e-mails are not sent.
You can use
menu “Application log” where all notifications are track to check if a mail had
been triggered. Details of each log event describe what happen with a given
notification. So you can easily troubleshoot in case it is failing
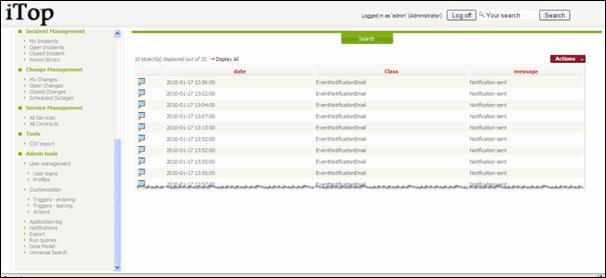
Figure 24
![]() If you are running iTop on Linux server, you
need to make sure that php.ini file contain following line:
If you are running iTop on Linux server, you
need to make sure that php.ini file contain following line:
sendmail_path = "/usr/sbin/sendmail -t
-i"
![]() If you are running iTop on Windows server, you
need to make sure that php.ini file contain following line:
If you are running iTop on Windows server, you
need to make sure that php.ini file contain following line:
SMTP = <smtp server>
smtp_port = 25
In order to
test mail notification we create page http://<itop server
location>/setup/email.test.php it allows you to test mail sending and check
prerequisites.
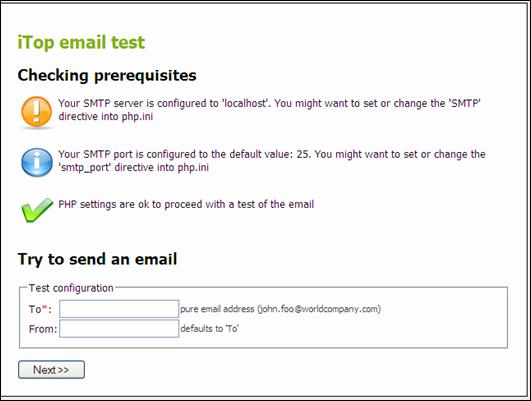
Figure 25
Viewing
data model
You can
view current data model used by iTop application by clicking on menu “Data
Model”. Following tree explorer allows you to navigate through each class of
object.
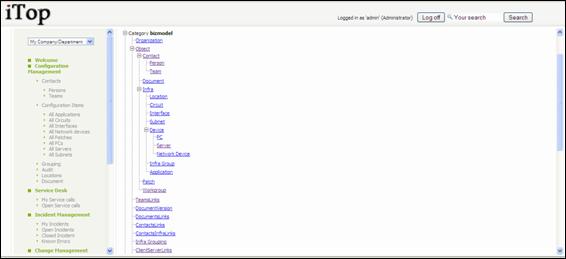
Figure 26
When you
click on object link, you get details for a given class.
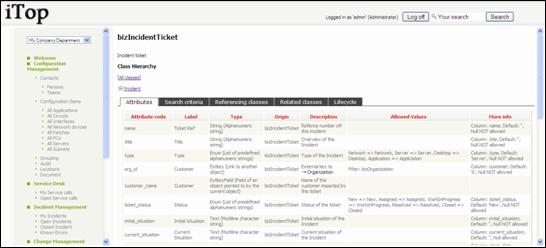
Figure 27
“Attributes”
tab displays all attributes for this class.
“Search
criteria” tab displays all attributes you can use in search engine.
“Referencing
classes” tab displays classes having a reference to current one.
“Related
classes” tab displays classes related to this one via external key.
“Lifecycle”
tab displays lifecycle workflow graph and information.
Running
Object queries
The menu
“run queries” allows you to test OQL queries (See OQL reference guide).
It includes
as well some predefined queries to be used as examples.
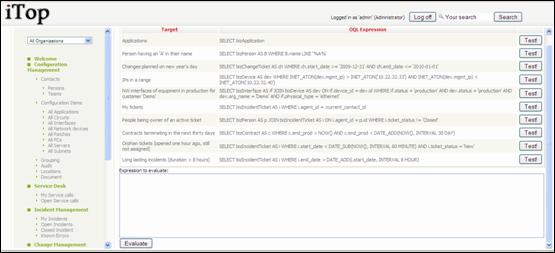
Figure 28
Managing
Audit
In the
current version Audits are managed directly in the database, so it is
recommended to ask an iTop consultant to configure them on your behalf.
Rules are
stored in priv_auditrule and priv_auditcategory
tables.
The table priv_auditcategory
defines rule categories. A rule category defines list of objects that
are concerned by associated rules. For instance all devices that are on
production.
The table priv_auditrule
defines the rule that need to be check for a given category. For instance “We
don’t want to have devices on production located on a Site in implementation”.
You need to
make sure that for a given audit category, rules applies for a same class of
object. For instance, you cannot have an audit category applicable for devices,
that check rules on sites.
Managing
Dashboard
Dashboards
are defined as web page stored in the iTop database. In version 0.8 there is no
UI to edit them. So for adding new graphics you have to edit manually databse.
They are
linked to menu definition which is stored in table priv_menunode . Only 4 menus are linked to dashboard:
·
Configuration
Management
·
Incident
Management
·
Change
Management
·
Service
Management
Thus only
those menus can be modified, else you may break behavior of iTop application.
Dashboards
are in fact html tables containing itopblocks.
So if you need to add new graphics you just have to add a new cell in the table
containing an itopblock.
An
itopblock is the combination of an OQL query, a grouping criteria and a type of
graphic. There are 3 types of itopblock:
- Bar chart
- Pie chart
- Display list
Syntax for
an itopblock:
<itopblock
BlockClass="DisplayBlock" objectclass="class of object" type="type of graphics" parameters="parameters for graphic"
asynchronous="false" encoding="text/oql">OQL query</itopblock>
Class
of object corresponds
to type of object your are interested in data model (bizIncidentTicket,
bizServer …)
Type
of graphics corresponds
to the way you want to display results: count
for table or open_flash_chart for
graphics.
Parameters
for graphic correspond
to information for defining a graph:
- chart_type:pie;group_by:<object attribute to use for group
by>;chart_title:<Title>
for pie chart
- chart_type:bars;group_by:<object attribute to use for group
by>;chart_title:<Title> for bar chart
- group_by: :<object attribute to use for group by> for tables
OQL is the query that list of object we
would like to include in this dashboard. See OQL reference guide for more
details
Following
is an example of menu definition for “Incident Management” menu:
<style>
.dashboard {
vertical-align:top;
width:50%;
border:1px solid #000;
-moz-border-radius:10px;
padding:5px;
text-align:center;
}
</style>
<p
style="text-align:left; font-family:Verdana, Arial, sans-serif;
font-size:24px;">Incidents Overview</p>
<table border="0"
padding="5">
<tr>
<td
class="dashboard">
<itopblock
BlockClass="DisplayBlock" objectclass="bizIncidentTicket"
type="open_flash_chart"
parameters="chart_type:pie;group_by:type;chart_title:Incidents by
Type" asynchronous="false" encoding="text/oql">SELECT
bizIncidentTicket</itopblock>
</td>
<td
class="dashboard">
<itopblock
BlockClass="DisplayBlock" objectclass="bizIncidentTicket"
type="open_flash_chart"
parameters="chart_type:bars;group_by:ticket_status;chart_title:Incidents
by status" asynchronous="false"
encoding="text/oql">SELECT bizIncidentTicket</itopblock>
</td>
</tr><tr>
<td
class="dashboard">
<p
style="text-align:left; font-family:Verdana, Arial, sans-serif;
font-size:16px;">Incidents by Workgroup</p>
<itopblock
BlockClass="DisplayBlock" objectclass="bizIncidentTicket"
type="count" parameters="group_by:workgroup_name"
asynchronous="false"
encoding="text/sibusql">bizIncidentTicket</itopblock>
</td>
<td
class="dashboard">
<p
style="text-align:left; font-family:Verdana, Arial, sans-serif; font-size:16px;">Incidents
not yet assigned</p>
<itopblock
BlockClass="DisplayBlock" objectclass="bizIncidentTicket"
type="list" parameters="dashboard:true"
asynchronous="false"
encoding="text/sibusql">bizIncidentTicket: ticket_status =
'New'</itopblock>
</td>
</tr>
</table>
Managing
DB backup
All iTop
data are stored in MySql database. So we recommend you to set up backup policy
for your database.
You can use
for instance phpMyAdmin to do so.
We
recommend you to do it frequently in order to not loose data modified by iTop
users.
Integrating
with other application
How
to export data out of iTop
A set of
objects can be exported by the mean of a web service (could be scripted)
Simply call
/pages/export.php?format=xml&expression=OQL
(format=csv
is also available)
Using wget,
this would give the following command line:
wget --header="Content-Type:application/x-www-form-urlencoded"
--post-file=./login.txt -O "export.txt" http://<server>/webservices/export.php?format=csv&expression=...
Option –O
return result in file export.txt
Format for
file login.txt should be:
operation=login&auth_user=<your user>&auth_pwd=<your password>&foo=1
The set of
objects to be exported is defined in an OQL query.
OQL stands
for Object Query Language. The OQL syntax is very close to the SQL.
The main
differences between SQL and OQL are:
* No FROM clause: an OQL query always return a
set of objects of a given class
and the user will never specify the expected
columns, because the OQL
interpreter retreives this information from
the Data Model.
* JOINS: simply specify "JOIN" and
the interpreter will determine for you if an
INNER JOIN or an OUTER JOIN should be
performed, based on the definitions of
the Data Model.
OQL
Examples:
Get all the
contacts
SELECT
bizContact
Get all the
persons (note that a person is contact also, but it has more
attributes
to be exported: first_name and employee_number)
SELECT
bizPerson
Get the WAN
circuits provided by "Foo Telecom"
SELECT
bizCircuit JOIN bizOrganization ON bizCircuit.provider_id = bizOrganization.id
WHERE
bizOrganization.name = 'Foo Telecom'
Get the WAN
circuits providers
SELECT
bizOrganization JOIN bizCircuit
ON
bizCircuit.provider_id = bizOrganization.id
(In this
example we have just inverted bizCircuit and bizOrganization ; yes the order
matters, the first class specified is the expected class)
How
to import data in iTop
A web
service allows you to write a script to enter new data, or refresh existing
data. This
can be helpful for the initial load or to schedule a daily synchronization
of the data
coming from an external data source - could be another application,
an
automated data collector, etc.
/webservices/import.php?class=bizOrganization&csvdata=<multine-csv>[&separator=<char>]
Note that
this service emulates the functionality provided by the interactive
bulk load:
/pages/import.php
csvdata
must be posted, the first line will contain the codes of the attributes
to load,
the first column is always used as the reconciliation key
- should be
unique, as it determines if the object needs to be updated or created)
If not
specified, the separator defaults to ';'
The answer
is given in a simple html format, explaining what has been done for each row of
data.
Example:
A script
that creates a company called "Food and Drug Administration" (code
FDA).
wget
--header="Content-Type:application/x-www-form-urlencoded"
--post-file=data.txt
http://<yourserver:port>/webservices/import.php?class=bizOrganization
with:
data.txt containing the following text
auth_user=<username>&auth_pwd=<pwd>&operation=login&csvdata=name;code
Food and
Drug Administration;FDA
Combodo;CBD