iTop 0.8
User guide

Don’t hesitate to ask question
to support@combodo.com
Table
of content
Filtering on a given organization
Managing relationships between
objects
Assigning or re-assigning a ticket
to workgroup or agent
Using Incident management module
Assigning or re-assigning a ticket
to workgroup or agent
Using Change management module
Monitoring and closing a change
ticket
Using Service management module
Viewing services provided by an
organization
Viewing contract used by a given
organization
Moving a contract to production
This
document describes release 0.8 of iTop. iTop is a robust Open Source web 2.0
application that will help you to better support your IT. Development of iTop
started in March 2006 in order to publish on the internet a completely open
solution that would help enterprise to drive ITIL best practices
implementation. Goal of the iTop community was to provide an alternative solution
to very expensive solutions sold by standard software vendors.
At the
early beginning of the project, the development team was focus on building the
most complete CMDB (Configuration Management Data Base). One key objective was
to make it as flexible as possible in order to allow administrator to add and
remove configuration items from the data model and manage as many relationships
as they want. The development team also designed a powerful state machine that
allows defining life cycle for whatever configuration items in the CMDB.
Realizing
that all concepts developed within the CMDB can be applied to all other ITIL
best practices, the iTop community decided to extend them to Incident
Management, Change Management and Service Management modules. Then iTop became an
IT operational portal that helps all IT management team to support their
environment by:
Documenting IT infrastructures and their
relationships (servers, application, network …)
Documenting all users service calls.
Documenting IT incident and planned outages, as
well as a known error database.
Documenting all IT services and contracts with
external providers.
iTop
application can be used by different type of profiles:
Help Desk
IT support engineers (1st level, 2nd
level, 3rd level …)
IT service managers
IT managers
iTop
application is relying on Apache, MySQL and PHP, so it can run on whatever
operating system supporting those applications. It had been tested already on
Windows, Linux Debian and Redhat. As it is a web based application you don’t
need to install client on user PC. A simple web browser is enough to use it.
iTop is licensed under the
terms of the GNU
General Public License Version 3 as published by the
Free Software Foundation. This gives you legal
permission to copy, distribute and/or modify iTop under certain conditions.
Read the ’license.txt’ file in the iTop distribution.
iTop is provided AS IS with
NO WARRANTY OF ANY KIND, INCLUDING THE WARRANTY OF DESIGN, MERCHANTABILITY, AND
FITNESS FOR A PARTICULAR PURPOSE.
Goal of
this release was to make the application more robust and more professional. To
achieve these goals we developed new features that are mandatory for such
application and we fixed a large number of bugs. Just remember that some of the
improvement depends on the new data model provided with release 0.8. So if you
keep former one, you may have some bugs not fixed. We also underline the fact
that the new data model is not compatible with the one you currently have. So
we recommend you to check “Migration” chapter in Administrator guide to use the best practice to migrate.
New features
We improve
a lot the management of user. Now, the application allows you to create, update
or delete users. In this process, administrator can assign one or several
profiles to a given user. This feature is fundamental to define roles and
responsibilities within your company.
With
release 0.8 mandatory fields for a given object are now controlled, so the
users are forced to update those fields before committing there changes.
Mandatory fields are controlled in the data model either when defining the
attribute, or in the state machine when we move from one state to another.
We improve
also the way we manage N/N relationships in the UI. Now users can add, update
or remove relationships via an easy to use wizard that help them to search
objects they would like to link together. This feature decreases significantly
time to create relationships between objects and so improve productivity.
In order to
make iTop useful without any customization, we improve the data model. We
change object lifecycles to make them more reliable, and we add new type of
object:
·
Subnet,
for which we compute automatically IP used and IP free.
·
Service
calls helping your company to track all end user requests.
·
Services
that allow you to document all services an organization is providing.
We also
improve significantly change tracking for each object in order to make it
easier to read in UI when users check what had been modified for a given item.
Deletion of
devices had been improved, in order to guarantee consistency of the database.
Now, when a user wants to delete an object, the application is checking
relationships with other objects. This object won’t be removed if it is linked
to another object via a 1/n relationship. For instance the application won’t
delete a server if there is network interfaces or applications still documented
for it.
Last but
not least, we improve iTop architecture to improve performance of queries in
the MySql database, and so display more quickly data in UI.
Bug fixed
All our
bugs are track on sourceforge: http://sourceforge.net/apps/trac/itop/report/1.
This current release is fixing 11 critical bugs:
#4 PHP class
name vs class label
#25 Loosing impacted infrastructure in
tickets
#26 Organization silo not working for
Incident/Change and Services
#30 Run queries example is failing
#32 Strange error when executing some
action.
#33 OQL: Failing to interpret a JOIN
#36 Setup fails if
"short_open_tag" is not enabled
#37 deprecated function
'session_is_registered' in PHP 5.3.0
#38 Content of Tabs not displayed on
Reload
#39 Setup does not work when installed
on IIS
Release 0.8
is not supporting:
·
Creation
of new user profile.
·
Delete
all functionality for a list of object
·
Cloning
an existing device. This feature had been de-activated for the moment as it was
not working properly.
·
Update
all for n/n relationships
·
A
life cycle is not defined for all CI, only for servers, service calls, incident
tickets, change tickets, services, and contracts.
Starting
iTop
To use
iTop, you just need a simple web browser and enter the following URL:
http://yourserver
or http://yourserver/<itop alias>
if you have created a particular apache alias for the application.
User is
prompt to enter his login and password.
Figure 6
Depending
on its profile, the user has more or right to use the application, but this
topic will be discussed later in “User Management” chapter.
Once
authenticated, the user accesses the main iTop page.
Figure 7
This main
page is divided in three parts:
·
Left
menu (also called explorer menu) to
access item from each module (CMDB, Incidents, Changes, Services and contracts)
·
Main
frame on the right displays list of items from selected module, or details for
a given item.
·
Top
frame to use global search function, and display login information
Using
Explorer menu
Filtering
on a given organization
This
explorer allows you to navigate across all iTop modules. The “drop down” list
at the top defines the organization you would like to work with. An organization is a way to group all iTop
items into silos. When you have selected a given organization, you will see
only items belonging to this one if you are allowed to see them.
Figure 8
Accessing
dashboards
The green
menu items define each module of iTop application:
·
CMDB
·
Incident
Management
·
Change
Management
·
Service
Management
All sub
menus are related to one of the corresponding module.
When you
click on green menu items, you access a dashboard corresponding to this module.
Those dashboards provide an overview of the health of your IT using either pie
, bar charts or tables. It is displayed in the Main Frame.
Figure 9
Accessing
list of items
When you
click on grey menu item within a given module, you get in Main Frame a list of
items corresponding to a predefine query in iTop data model. For instance when
clicking on “All server” you get a list of server belonging to selected organization.
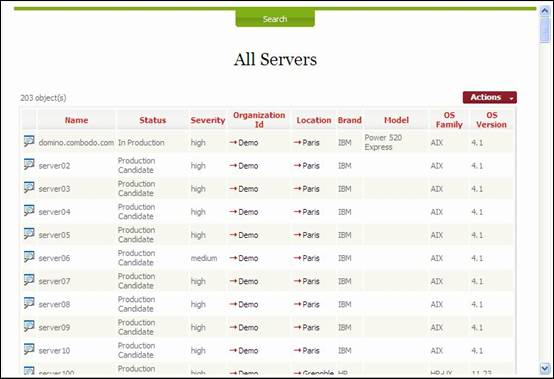
Figure 10
We will
describe later description of the sub menus for each module.
Navigating
within iTop
You can
navigate easily from one object to another by simply clicking on fields led
by ![]() .
.
As the
application is completely web based, you can right click on you mouse to open
this web link into a new window or tab depending on your web browser.
This
functionality is really useful in iTop as it allows you to follow relationships
between objects
Action
on list of items
The ![]() button on the top right corner of a list of
items allows you to use predefine actions applicable for this list.
button on the top right corner of a list of
items allows you to use predefine actions applicable for this list.
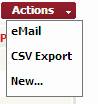
Figure 11
“eMail”
allows you to send a mail including a direct web link to the iTop you are
currently viewing. This feature is really useful for sharing information with
others.
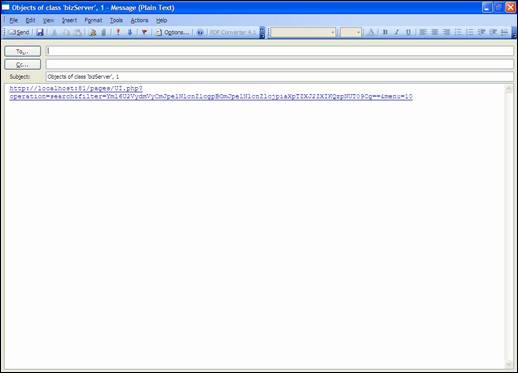
Figure 12
“CSV
export” allows you to export list of items you are currently viewing into a csv
file in order to use it in Excel for instance.
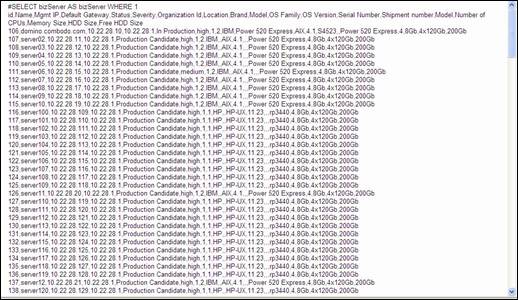
Figure 13
“Bookmark” allow
you to save as a new sub menu in the Bookmark module the list you are currently
viewing. This feature is useful to share with other users a list of items
corresponding to a given search criteria.
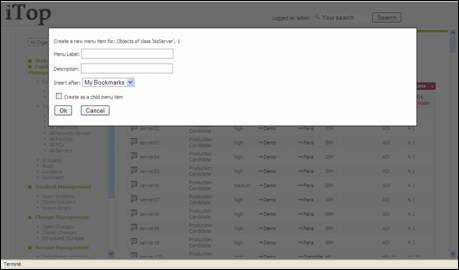
Figure 14
You can
define the menu label, as well as a description to document your bookmark.
“New” allow
you to create a new item corresponding to the type of object you are viewing,
for instance a new server or a new incident ticket. When clicking on this
action you get a wizard that helps you to create your item. New item creation
will be discuss later for each module.
“Modify
all” allow you to modify attributes for the list of item you are currently
viewing. This feature is useful when you want to update quickly some attributes
with the same value for a given list of items. For instance update the Brand of
a list of servers with “Dell”.
“Delete
all” allow you to delete massively all items you are currently viewing. Be
careful in the release 0.72 you are not prompted with a confirmation window.
Other
actions may be available, but they depend on type of object you are viewing,
and their life cycle. We will describe them later for each module if required.
Searching
a type of object
When you click
on ![]() button it displays the search criteria bar
that allows you to refine list of item you are looking for.
button it displays the search criteria bar
that allows you to refine list of item you are looking for.
You can
define by your self the criteria you are interested in, using either drop down
lists, or regular expression for blank fields. Then click on ![]() button to display a new list of item
corresponding to your request.
button to display a new list of item
corresponding to your request.

Figure 15
“And”
operator is used when you define multiple criteria. This search bar is
available for any type of object, but of course search criteria depend on
object attributes. The search request is applicable to only one type of object
at once.
When you
click again on ![]() ,
the search bar is hidden.
,
the search bar is hidden.
Accessing object
details
From a list
of items, you can click on ![]() to open the details page of a given item.
to open the details page of a given item.
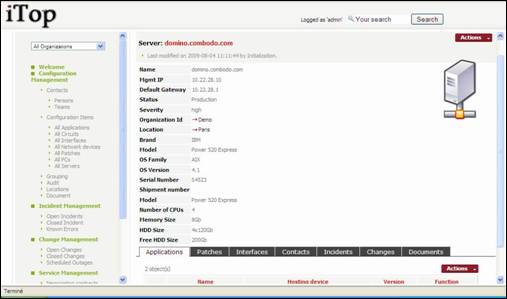
Figure 16
This page
displays, in the Main Frame, the attributes for a given item. As for item list,
you can click on ![]() to open details page for a related object.
to open details page for a related object.
The top
banner displays type and name of the selected item, as well as last
modification information. When you click on ![]() a drop down list displays all changes that
occurred on the corresponding item.
a drop down list displays all changes that
occurred on the corresponding item.
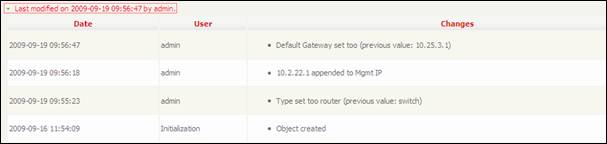
Figure 17
This feature
is very important to track when modification where done and by who. When you
click again on ![]() ,
list is hidden.
,
list is hidden.
At the
bottom, the tabs display the relationships between the selected item and other
objects. For instance applications or patches installed on a server, incidents
or changes occurring on a server. The tabs will be described in detail later
for each module.
Action
on a given item
The ![]() button on the top right corner allows you to
use predefine actions applicable for the item.
button on the top right corner allows you to
use predefine actions applicable for the item.
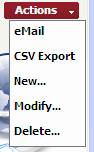
Figure 18
“eMail”,
“CSV Export”, “Bookmark”, “New”, and “Delete” are similar to action described
for a list of item sooner in this document.
“Modify”
allow you to modify attributes for the item you are currently viewing. A wizard
opens, and lets you modify the attributes and relationships with other items.
The wizard will be described later for each module.
“Clone”
allow you to create a new item using attributes filled for another one. This
feature is really useful when you want to create an item from another one that
has similar attributes. The wizard for item creation opens with attributes
already filled, and lets you modify them. A new item is created when you close
the wizard.
Other
actions may be available, but they depend on type of object you are viewing,
and their life cycle. We will describe them later for each module if required.
Managing
relationships between objects
The tabs in
“object detail page” are displaying relationships with other objects stored in
the data base. iTop allows you to manage either (1,n) or (n,n) relationships.
An example of (1,n) relationship is an network interface plugged on a server.
An example of (n,n) relationship is a link between several servers and several
contacts.
When you
click on tabs in “object detail page”, the UI displays list of objects linked
to the current one. The ![]() button on the top right corner of the list
allows you to manage the relation.
button on the top right corner of the list
allows you to manage the relation.
(n,n) relationship management
For such
type of relation, you can add, manage or remove all links between objects.
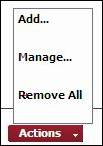
Figure 19
Add action opens following wizard to manage new
relations to add with current object
You can
search objects to link using the wizard, and select those you would like to
link. You can also update attributes for the relationship, for instance impact
for an incident.
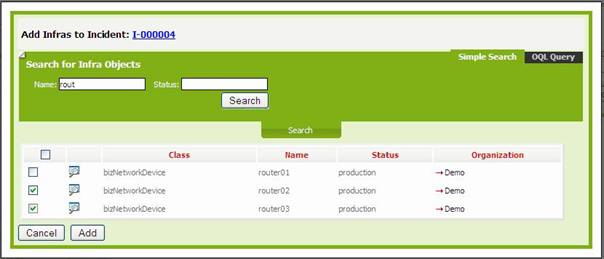
Figure 20
For
searching object to link you can also OQL query request. (see OQL reference
guide for more details on building an OQL query)
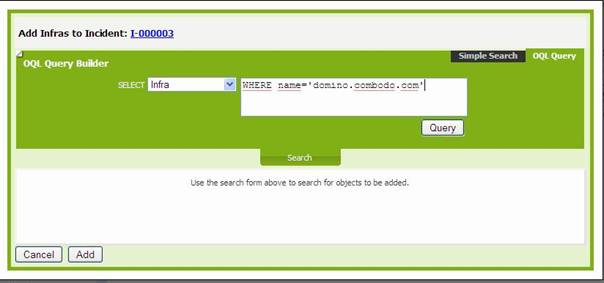
Figure 21
Manage action allows you to modify attribute for
already existing relationships, or add and remove some.
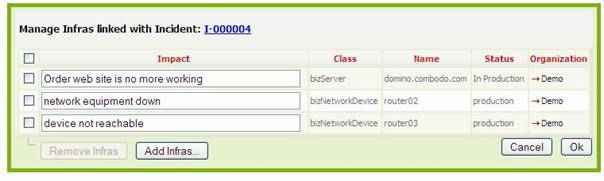
Figure 22
Remove all
action suppresses all relationships created for a selected object.
![]() Those wizards don’t allow you to create new
applications, or contracts. They are used only to build relationships.
Those wizards don’t allow you to create new
applications, or contracts. They are used only to build relationships.
(1,n) relationship management
Global
search
This
feature is really fundamental in iTop. Like in “Google”, it allows you to
search words or regular expression in the full data model, whatever type of
object you are interested in.
Types for
instance “![]() and type
on
and type
on ![]() . You get all objects related to this word:
. You get all objects related to this word:
Contacts on this site
Servers, PC, and network devices installed on
this site.
Incident occurring on items located on this
site …
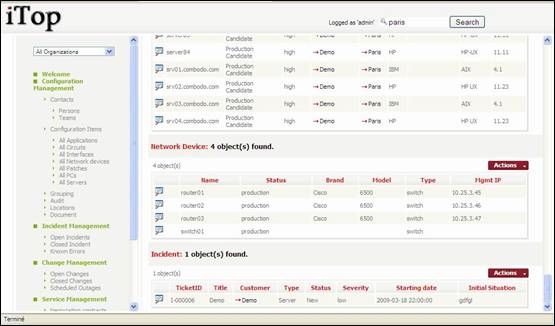
Figure 19
You can
also use regular expression like “%sw%” for instance.
Using
global search helps you to get quickly information on your IT, without knowing
really where to look for. Like in “Google”, it is really powerful and
straightforward.
Using
direct URL
As iTop is
completely web based you can access directly whatever page using its URL either
by copying it from web browser or by using action “eMail”. This feature allows
you to:
·
bookmark
you favorite pages
·
share
pages with other people
·
build
HTML dashboards
·
integrate
iTop within a third party application
When
accessing directly an iTop URL, you are prompted to enter your login and
password if you are not already authenticated.
This module
is related to Configuration Management Data Base as described in ITIL best
practices.
It allows
IT operators to describe all items they have under their control. It provides a
logical model of the IT infrastructure by identifying, controlling, maintaining
and verifying the version of all existing Configuration Items (CIs).
Relationships
between CIs are also documented in this CMDB, thus IT engineers can easily
analyse dependencies within the infrastructure and impact due to outages.
Release 0.72 of iTop handles:
·
Contacts,
Team and Workgroups for Incident and Change tickets
·
Locations
· Infrastructure (Desktop, Servers, Network devices, Circuits, Interfaces, Applications, Patches)
·
Groups
of CI
·
Documents.
Web URL only in this release
All CIs are
describes in iTop data model and can be modified. Thus this document describes
only data model that has not been customized.
All
modifications made on a CI are tracked with modification date, modified
attribute values (old and new one), and user who made the change.
Managing
Contacts
When you
click on “Contacts” in the Explorer bar, you get a dashboard summarizing
information about contacts:
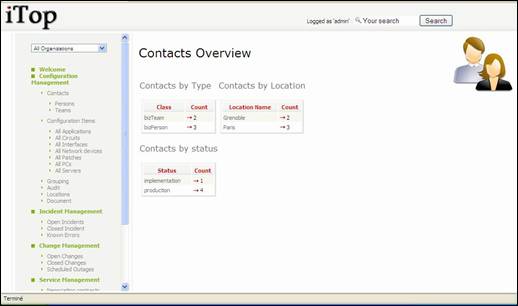
Figure 20
All pages
related to Contacts contains picture ![]() in top right corner. It allows operator to
know where he is when navigating across iTop.
in top right corner. It allows operator to
know where he is when navigating across iTop.
Managing
person
A person is
anybody that needs to be documented in the CMDB.
“Persons”
menu display all people belonging to selected organization.

Figure 21
When you
click on ![]() button you get details for selected person.
button you get details for selected person.
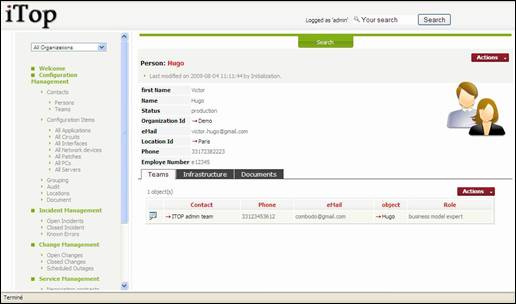
Figure 22
A person
belongs to only one location and one organization.
“Teams” tab
displays all team this person belongs to, with her role. You can easily manage those relationships as
describe in chapter “Managing relationships”
“Infrastructure”
tab displays all infrastructures owned by this person. You can easily manage those relationships as describe in chapter “Managing
relationships”
“Documents”
displays all documents linked to this person. You can easily manage those relationships as describe in chapter
“Managing relationships”
There is no
specific action related to a person. Only standard one describe sooner are
available.
To create a
new person you just have to click on “New” in action drop down list, from
either person list or a given person detail. Following wizard then appears:
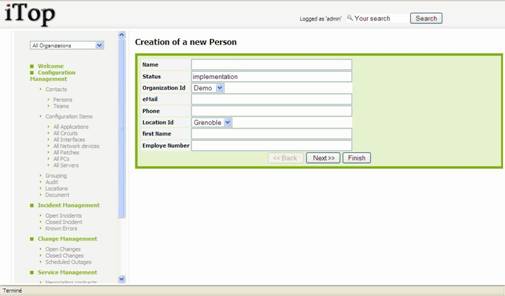
Figure 23
Fill in all
fields with needed information and click on ![]() .
A confirmation window appears, asking you to create the new person.
.
A confirmation window appears, asking you to create the new person.
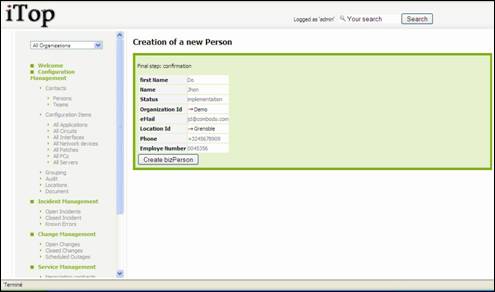
Figure 24
The details
page of this new person is automatically displayed.
You can
also use “Clone” action if fields to be entered are similar to an already
existing person as described in “iTop Common usage” chapter.
To modify a
person’s attributes, click on “Modify” in Action drop down menu. Following
wizard appears to modify attributes:
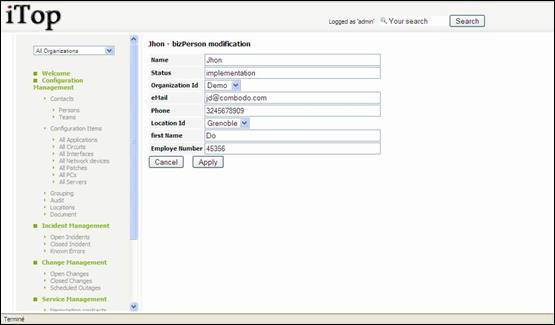
Figure 25
Managing
team
A team is a
group of person that needs to be documented in the CMDB.
“Teams”
menu display all teams belonging to selected organization.
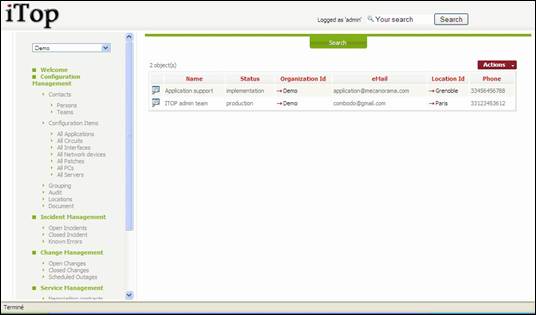
Figure 30
When you
click on ![]() button you get details for selected team.
button you get details for selected team.
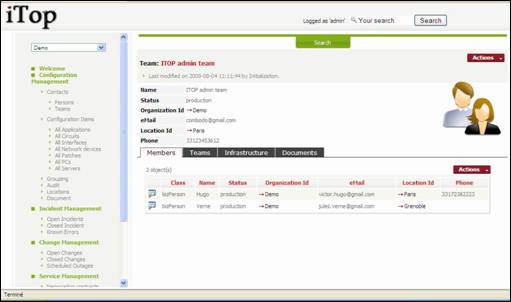
Figure 31
A person
belongs to only one location and one organization.
“Members”
tab displays all persons belonging to this team. You can easily manage those relationships as describe in chapter
“Managing relationships”
“Teams” tab
displays all teams this team belongs to, with its role. As a matter of fact we
can cascade teams with sub teams if required. You can easily manage those relationships as describe in chapter
“Managing relationships”
“Infrastructure”
tab displays all infrastructures linked to this team. You can easily manage those relationships as describe in chapter
“Managing relationships”
“Documents”
displays all documents linked to this team. You can easily manage those relationships as describe in chapter
“Managing relationships”
There is no
specific action related to a person. Only standard one describe sooner are
available.
Managing
Locations
A location
is a configuration item that allows you to document in the CMDB any
geographical location (Site, Building …).
“Location”
menu displays all locations belonging to selected organization.
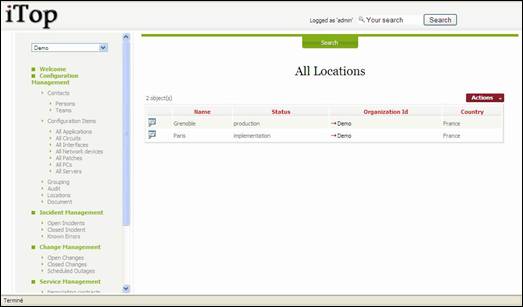
Figure 32
When you
click on ![]() button you get details for selected location.
button you get details for selected location.
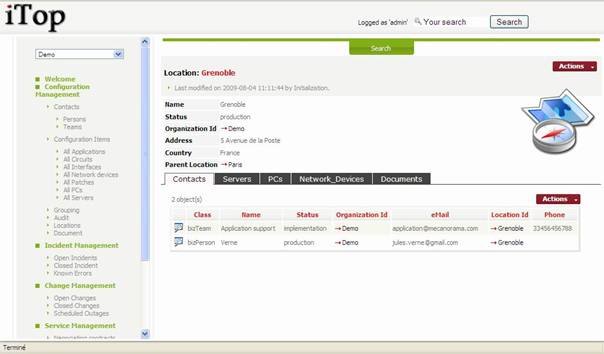
Figure 33
“Parent
Location” field allows you to cascade location in order to model hierarchy. For
instance a site is a parent location for a building.
“Contacts”
tab displays all contacts (persons and teams) located on this location.
“Servers”
tab displays all servers located on this location.
“PCs” tab
displays all pcs located on this location.
“Network
Devices” tab displays all network devices located on this location.
“Documents”
tab displays all documents related to this location (network diagram, maps …)
To create a
new location you just have to click on “New” in action drop down list, from
either location list or a given location detail. Following wizard then appears:
.
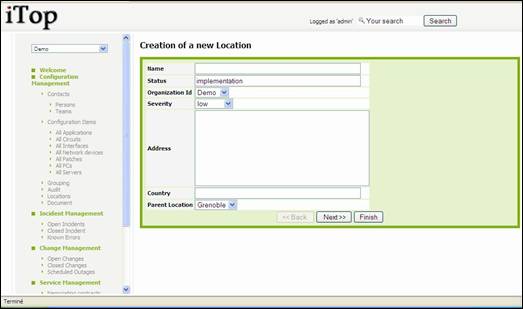
Figure 34
As for
creation of other configuration item, you just have to fill required fields,
and click on ![]() to get confirmation window and create new
location. Once created, details page for this new location automatically
appears.
to get confirmation window and create new
location. Once created, details page for this new location automatically
appears.
There is no
specific action related to a location. Only standard ones described sooner are
available
Managing
Infrastructures
An
infrastructure represents all hardware or software items installed in your IT.
iTop CMDB allows you to manage their life cycle as well as relationships
between items. Thus you can document applications installed on server,
client/server relationships between two applications, on which port of switch a
server is connected too …
Managing
PCs
This type
of configuration item is whatever laptop or desktop installed in you IT.
“All PCs”
menu displays all PCs documented for the selected organization.
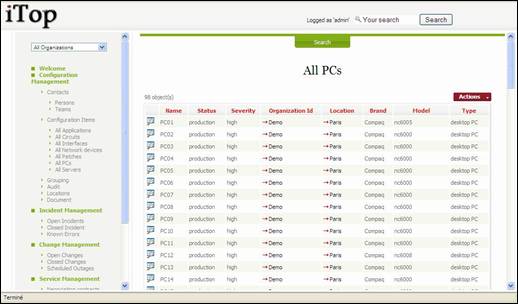
Figure 35
When you
click on ![]() button you get details for selected PC.
button you get details for selected PC.
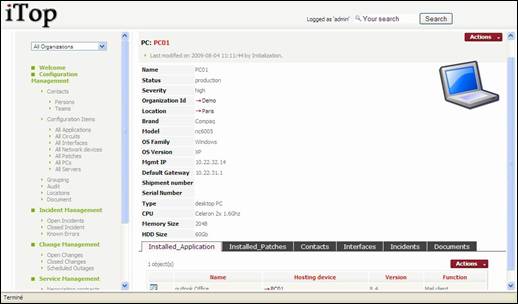
Figure 36
A PC
belongs to only one location and one organization.
“Installed
Application” tab displays a list of application installed on this PC.
“Installed
Patches” tab displays a list of patches installed on this PC.
“Contacts”
tab displays all the contacts documented for this PC. You can easily manage those relationships as describe in chapter
“Managing relationships”
“Interfaces”
tab displays all network adaptors documented for this PC.
“Incidents”
tab displays all open incidents related to this PC.
“Documents”
tab displays all documents related to this PC. You can easily manage those relationships as describe in chapter “Managing
relationships”
To create a
new PC you just have to click on “New” in action drop down list, from either PC
list or a given PC detail. Following wizard then appears:
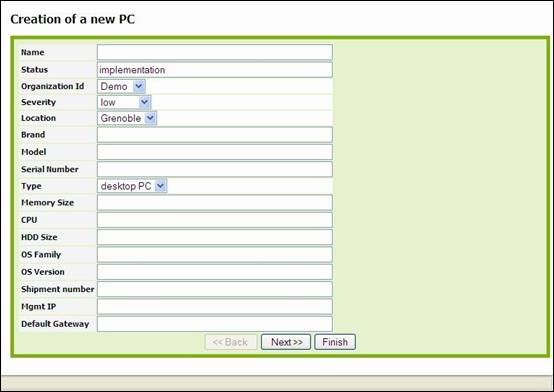
Figure 37
As for
creation of other configuration item, you just have to fill required fields,
and click on ![]() to get confirmation window and create new PC.
Once created, details page for this new PC automatically appears.
to get confirmation window and create new PC.
Once created, details page for this new PC automatically appears.
There is no
specific action related to a PC. Only standard ones described sooner are
available
There are
two options to create a new application installed on this PC:
Either by clicking on “Click here to create a
new Application” if
there is no application currently displayed in “Installed Applications” tab.
Or by clicking on ![]() -> “New”, if there are already several
applications displayed in “Installed Applications” tab.
-> “New”, if there are already several
applications displayed in “Installed Applications” tab.
In both
cases, wizard for creating an application appears. This one is described later
in “Managing Applications” chapter.
There are
two options to create a new patch installed on this PC:
Either by clicking on “Click here to create a
new Patch” if there is
no patch currently displayed in “Installed Patches” tab.
Or by clicking on ![]() -> “New”, if there are already several patches
displayed in “Installed Patches” tab.
-> “New”, if there are already several patches
displayed in “Installed Patches” tab.
In both
cases, wizard for creating a patch appears. This one is described later in
“Managing Patches” chapter.
There are
two options to create a new Interface installed on this PC:
Either by clicking on “Click here to create a
new Interface” if there
is no interface currently displayed in “Interfaces” tab.
Or by clicking on ![]() -> “New”, if there are already several
interfaces displayed in “Interfaces” tab.
-> “New”, if there are already several
interfaces displayed in “Interfaces” tab.
In both
cases, wizard for creating an interface appears. This one is described later in
“Managing Interfaces” chapter.
There are
two options to create a new Incident for this PC:
Either by clicking on “Click here to create a
new Incident” if there
is no incident currently displayed in “Incidents” tab.
Or by clicking on ![]() -> “New”, if there are already several
incidents displayed in “Incidents” tab.
-> “New”, if there are already several
incidents displayed in “Incidents” tab.
In both
cases, wizard for creating an incident appears. This one is described later in
“Using Incident management module” chapter.
There is no
specific action related to a PC. Only standard ones described sooner are
available.
Managing
Servers
“All Servers”
menu displays all servers documented for the selected organization.
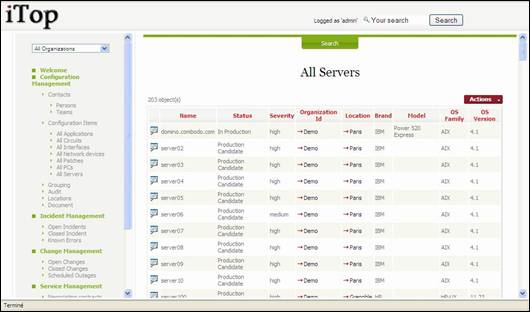
Figure 40
When you
click on ![]() button you get details for selected server.
button you get details for selected server.
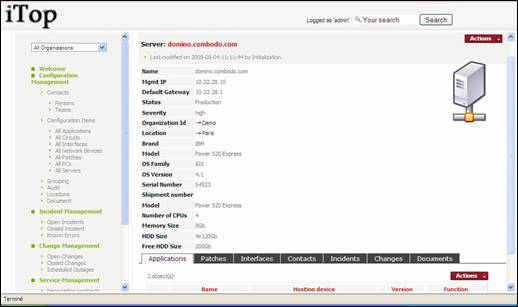
Figure 41
As for a
PC, a server belongs to one location and one organization.
“Application”
tab displays a list of application installed on this server.
“Patches”
tab displays a list of patches installed on this server.
“Interfaces”
tab displays all network adaptors documented for this server.
“Contacts”
tab displays all the contacts documented for this server. You can easily manage those relationships as
describe in chapter “Managing relationships”
“Incidents”
tab displays all open incidents related to this server.
“Changes”
tab displays all open changes related to this server.
“Documents”
tab displays all documents related to this server. You can easily manage those relationships as describe in chapter
“Managing relationships”
The way to
create applications, patches, interfaces, contacts, incidents and documents are
the same as the one documented in chapter “Managing PCs”.
There are
two options to create a new Change for this server:
Either by clicking on “Click here to create a
new Change” if there is
no change currently displayed in “Incidents” tab.
Or by clicking on ![]() -> “New”, if there are already several
changes displayed in “Changes” tab.
-> “New”, if there are already several
changes displayed in “Changes” tab.
In both
cases, wizard for creating a change appears. This one is described later in
“Using change management module” chapter.
Server life cycle and
custom actions
The state
machine integrate into iTop allows administrator to define a life cycle for
some configuration item. In release 0.72 we created a life cycle for server. By
this way we can enforce processes for server management. Thus user cannot
perform some actions, if server is not in a given state. More details about
life cycle management are describe in the “Administration” chapter.

Figure 42
This
diagram describes all states corresponding to server life cycle:
- InStore (Device in store)
- Shipped (The device had been shipped to
future location)
- Plugged (The device is connected to the
network)
- Pre-Production (The device is ready to be
move to production)
- Production (The device is on production)
- InChange (A change is being performed on
the device)
- BeingDeconfigured (The device is about to
be removed from is current location)
- Obsolete (The device is no more used)
Arrows
describes custom actions you can perform from one state to another. When a
server is in a given state, you can perform only some action.
Transitions
(actions) are defined as follow for each state:
- InStore (Device in store)
- Ship this server => Shipped
- Plug this server => Plugged
- Shipped (The device had been shipped to
future location)
- Store this server => InStore
- Plug this server => Plugged
- Plugged (The device is connected to the
network)
- Ship this server => Shipped
- Store this server => InStore
- Configuration finished => Pre-Production
- Pre-Production (The device is ready to be
move to production)
- Review configuration => Plugged
- Move to Production => Production
- Production (The device is on production)
- Change Start [No Click] => InChange
- Obsolete => Obsolete
- Decommission => BeingDeconfigured
- InChange (A change is being performed on
the device)
- End Change [No Click] => Production
- BeingDeconfigured (The device is about to
be removed from is current location)
- Ship this server => Shipped
- Plug this server => Plugged
- Store this server => InStore
- Obsolete => Obsolete
- Obsolete (The device is no more used)
- Recycle this server => BeingDeconfigured
Actions
corresponding to transition appear in ![]() drop down list only when server is in a given
state. When you perform a given life cycle action, the state of the server is
updated to the new one automatically.
drop down list only when server is in a given
state. When you perform a given life cycle action, the state of the server is
updated to the new one automatically.
Managing
Applications
An
application is whatever software installed on either a PC or a server.
“All
Applications” menu displays all installed application documented for the
selected organization.
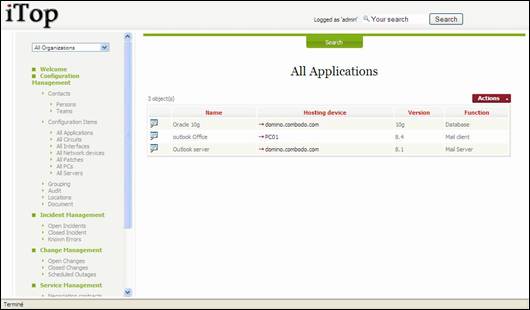
Figure 43
When you
click on ![]() button you get details for selected
applications.
button you get details for selected
applications.
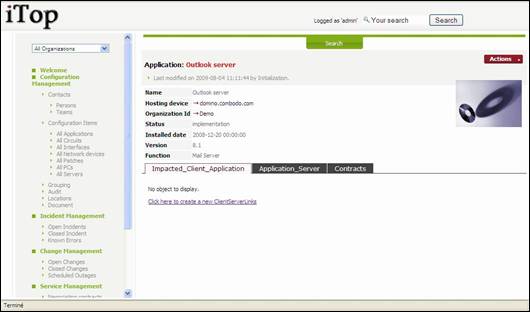
Figure 44
One
application CI is related to only one Hosting device. Thus you have a new
application for each server or PC it is installed on.
“Impacted
Client Application” tab displays all client application that depends on the one
you are viewing. You can easily manage those relationships
as describe in chapter “Managing relationships”
“Application
Server” tab displays all server applications for the one you are viewing. You can easily manage those relationships as
describe in chapter “Managing relationships”
“Contracts”
tab displays all contracts that cover the application you are viewing (support,
license contract …). You can easily manage those
relationships as describe in chapter “Managing relationships”
Managing
Patches
“All
Patches” menu displays all patches installed on server or PC for the selected
organization.
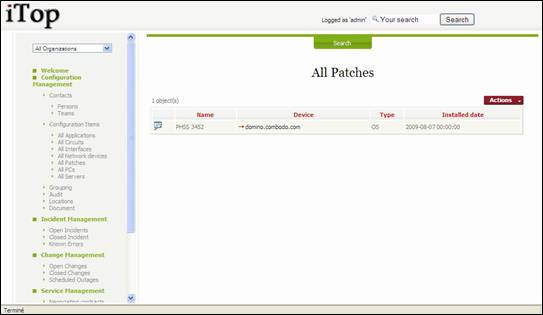
Figure 47
When you
click on ![]() button you get details for selected patch.
button you get details for selected patch.
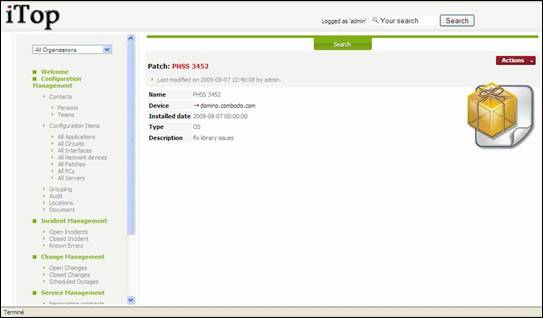
Figure 48
To create a
new patch you just have to click on “New” in action drop down list, from either
patches list or a given patch detail. Following wizard then appears:
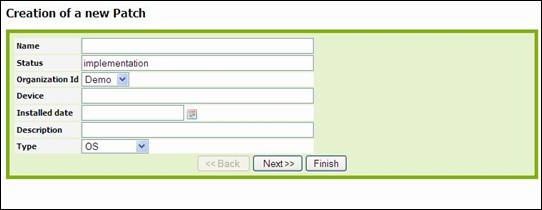
Figure 49
When you
click on ![]() you get confirmation window and create new
patch. Details for this patch are displayed automatically.
you get confirmation window and create new
patch. Details for this patch are displayed automatically.
If the same
patch is installed on several servers or PC you will have to create it for each
one.
Managing
Network Devices
The Network
device class regroups all routers, switches, firewall, etc, installed in your
environment. “All
Network device “menu display a list of such objects
documented in iTop.
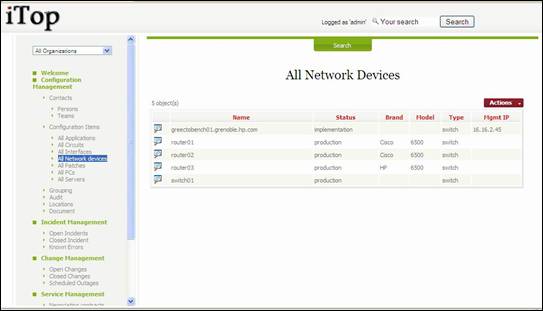
Figure 50
When you
click on ![]() button you get details for selected network
device
button you get details for selected network
device
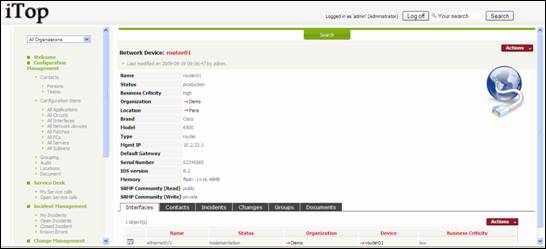
Figure 51
“Interfaces”
tab displays a list of network interfaces documented for the selected object.
You can add a new one by clicking on button ![]() on top right corner of this list. (see
Managing Interfaces for more details about Interfaces).
on top right corner of this list. (see
Managing Interfaces for more details about Interfaces).
“Contacts”
tab displays all contacts related to this object. For example team responsible
for providing hardware support for this devices. You can easily manage those
relationships as describe in chapter “Managing relationships”
“Incidents”
tab displays all incidents having an impact on the network device. You can
easily link the network device to a new incident, but this is managed most of
the time in the Incident management module.
“Changes”
tab displays all changes having an impact on the network device. You can easily
link the network device to a new change, but this is managed most of the time
in the Change management module.
“Documents”
tab displays all the documents that are linked to this device, for example
description of the hardware. You can easily manage those relationships as
describe in chapter “Managing relationships”
To create a
new network device you just have to click on “New” in action drop down list,
from either network device list or a given network device detail. Following
wizard then appears:
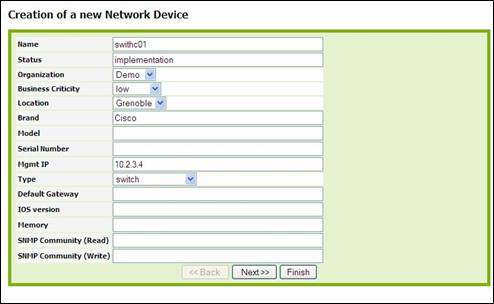
Figure 52
Fill in all
fields with needed information and click on ![]() .
A confirmation window appears, asking you to create the new network device.
Then click on create NetworkDevice.
.
A confirmation window appears, asking you to create the new network device.
Then click on create NetworkDevice.
Managing
Interfaces
An
interface is representing any card that allows connecting devices to the
network. It can be linked to network devices, PCs or servers.
“All
Interfaces” menu displays all those CI for a given organization.
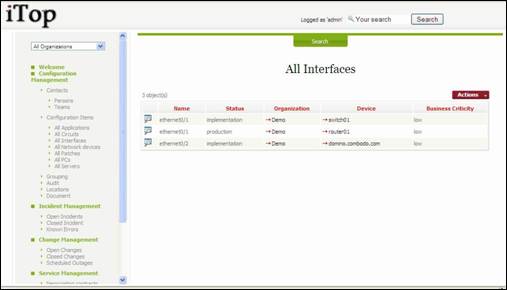
Figure 53
When you
click on ![]() button you get details for selected interface.
button you get details for selected interface.
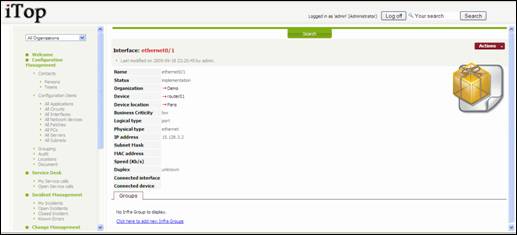
Figure 54
“Linked
Interface” tab displays the interface that is connected to the one you are
looking at.
To create a
new interface you just have to click on
“New” in action drop down list, from either interface list or a given interface
detail. We recommend doing it in the Interface tab of a Server, PC or Network
Device. Following wizard then appears:
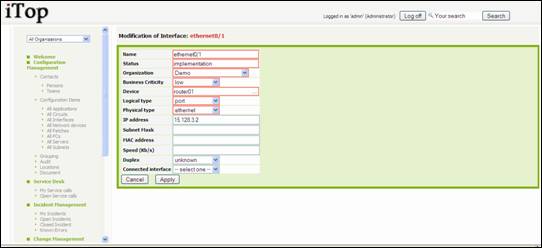
Figure 55
Fill in all
fields with needed information and click on ![]() .
A confirmation window appears, asking you to create the new interface. Then
click on create Interface.
.
A confirmation window appears, asking you to create the new interface. Then
click on create Interface.
Managing
Circuits
Circuits
are used to document WAN links between different sites.
“All
Circuits” menu displays all circuits for a given organization.
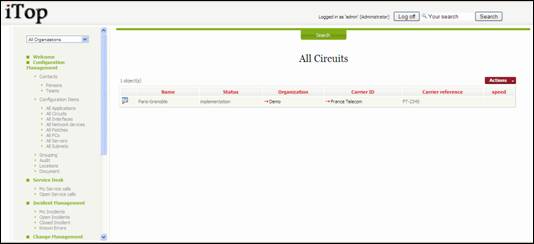
Figure 56
When you
click on ![]() button you get details for selected circuit.
button you get details for selected circuit.
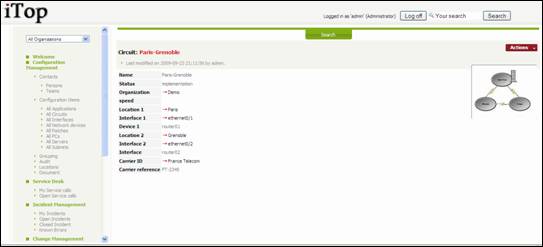
Figure 57
To create a
new circuit you just have to click on “New” in action drop down list, from
either circuits list or a given circuit detail. Following wizard then appears:
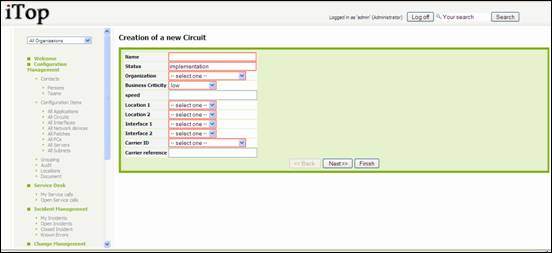
Figure 58
Fill in all
fields with needed information and click on ![]() .
A confirmation window appears, asking you to create the new circuit. Then click
on create Circuit.
.
A confirmation window appears, asking you to create the new circuit. Then click
on create Circuit.
Managing
Groups
Using iTop
you can group object together. Groups can be used for modeling any operational
need. For instance documenting all devices monitored by a given application.
The “Grouping” menu displays all groups created for the selected organization.

Figure 55
When you
click on ![]() button you get details for selected group.
button you get details for selected group.
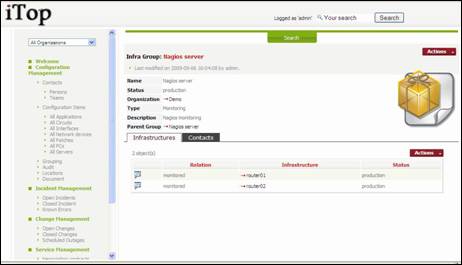
Figure 56
“Infrastructures”
tab displays all CI linked to this group. You can easily manage those relationships as
describe in chapter “Managing relationships”
“Contacts”
tab displays all contacts related to this group, for instance the team or the
people responsible for keeping this group up to date. You can easily manage
those relationships as describe in chapter “Managing relationships”
To create a
new group you just have to click on “New” in action drop down list, from either
group list or a given group detail. Following wizard then appears:

Figure 57
Fill in all
fields with needed information and click on ![]() .
A confirmation window appears, asking you to create the new group. Then click
on create Group.
.
A confirmation window appears, asking you to create the new group. Then click
on create Group.
Using
Audit
Audits in
iTop are used to track the consistency of information stored in the
application. For instance “Do I have servers on production located on a site
that is under implementation?” This function is key as it make sure that the
process of documenting your IT is well followed.
“Audit”
menu displays in a table all rules and the result of the audit computed real
time.
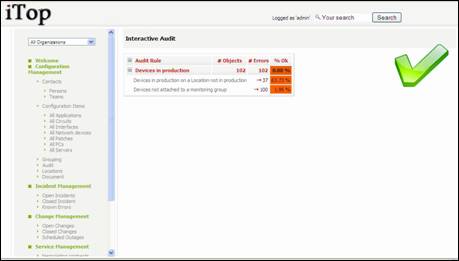
Figure 57
When you
click on “# Errors” for a given rule, you get a list of object that are not
documented properly:
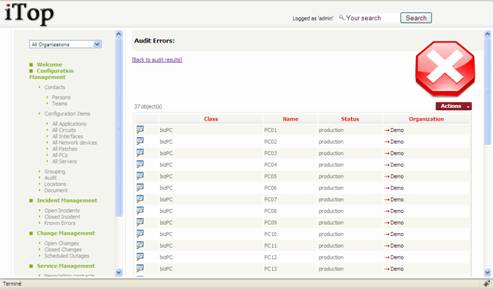
Figure 58
The
administrator guide describes how to create a new rule to be checked.
The service
desk module allows you to document all service calls coming from end users.
Call can by assign to workgroup that would be responsible for making sure
request is handled.
Those
service calls can be linked to infrastructures and related incidents.
Service
call life cycle
In order to
enforce service desk processes, iTop includes a life cycle for service call
object. Moving from one state to another will require some action from support
agent, for example updating action log and resolution code before closing a
ticket.
The life
cycle is described in following diagram:

Figure 58
Viewing
Service call
“Open Service
calls” menu displays all service call currently open for the selected
organization.
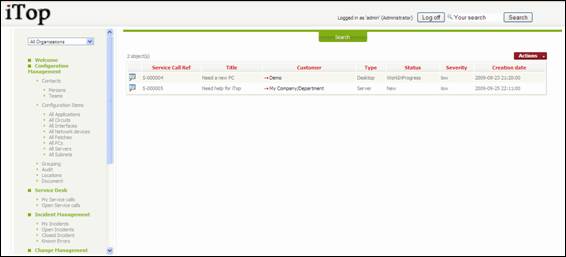
Figure 59
When you
click on ![]() button you get details for selected service
call.
button you get details for selected service
call.

Figure 60
“Impacted
Infrastructures” tab displays all infrastructures related to this service call.. You can easily manage those relationships as
describe in chapter “Managing relationships”
“Related
Incident” tab displays all incident tickets that are linked to this service
call. This allows support agent to regroup a list of service call with a ticket
that represent the root cause of the issue encountered by end users. You can
easily manage those relationships as describe in chapter “Managing
relationships”
Creating
Service call
There are
several ways to create a service call: either using ![]() from a list of service calls and selecting
“New”, or from the detail page of an other service call and using
from a list of service calls and selecting
“New”, or from the detail page of an other service call and using ![]() and selecting “New”.
and selecting “New”.
A wizard
then helps you to create your service call with several steps:
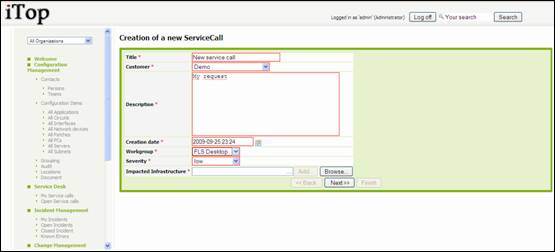
Figure 61
You can add
Impacted Infrastructure by filling corresponding field and clicking on ![]() as many times as you want. You can also use
as many times as you want. You can also use ![]() button.
button.
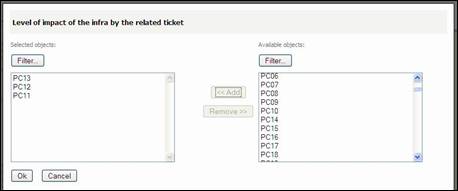
Figure 62
Once
selected impacted infra, you are prompt to enter the impact

Figure 63
Once
selected all impacted infrastructure click on ![]() to go to next step.
to go to next step.
You are
prompt to enter if needed ticket related to this one and caller:
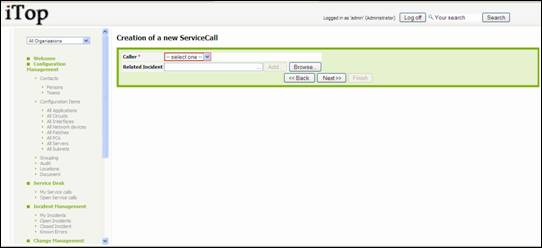
Figure 64
As for
management of impacted infrastructure, you can use either ![]() or
or ![]() button to find your related tickets. Then
click on
button to find your related tickets. Then
click on ![]()
You are
prompt to enter other information for the service call as type, impact, action
logs …
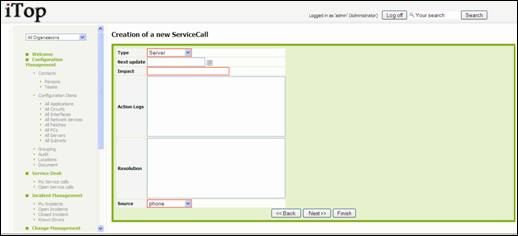
Figure 65
Click on ![]() once done. A confirmation window opens. Click on Create ServiceCall for validating
the creation. The details page for the new service call open
once done. A confirmation window opens. Click on Create ServiceCall for validating
the creation. The details page for the new service call open
Updating
Service call
You can
update a service call at any time, but fields you can modify depend on status
of the ticket.
Assigning
or re-assigning a ticket to workgroup or agent
Click on ![]() button of the details page and select “Assign
this call”. A wizard opens to let you enter an agent.
button of the details page and select “Assign
this call”. A wizard opens to let you enter an agent.

Figure 66
Click on ![]() for validating your change. The status of the service
call changes to “assigned”
for validating your change. The status of the service
call changes to “assigned”
Working
on a service call
When you
are ready to work on a service call you can click on ![]() button of the details page and select “Work on
this call”.
button of the details page and select “Work on
this call”.
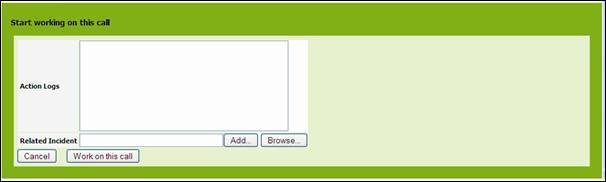
Figure 67
Click on ![]() to validate status change. New status for this
service call is “WorkInProgress”.
to validate status change. New status for this
service call is “WorkInProgress”.
Resolving
a service call
When the service
call is resolved, you can close it. Click on ![]() button of the details page and select “Resolve
this call”. A wizard opens to let you enter either a resolution:
button of the details page and select “Resolve
this call”. A wizard opens to let you enter either a resolution:
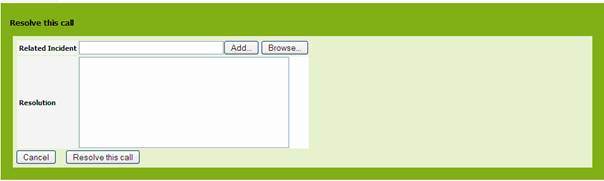
Figure 68
Click on ![]() for closing the incident ticket. Status is now
“Resolved”. You won’t be able to change this ticket anymore.
for closing the incident ticket. Status is now
“Resolved”. You won’t be able to change this ticket anymore.
Service
call Dashboard
The green
menu “Service Desk”, displays dashboard for service desk module. It help
support organization to track:
Service
Call by type Service call by status
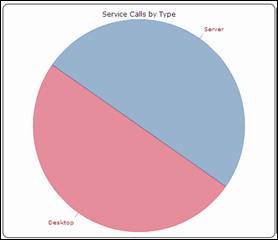
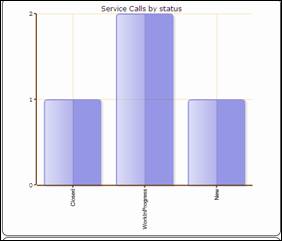
Figure 69
Service
call by Severity Service
calls not yet assigned
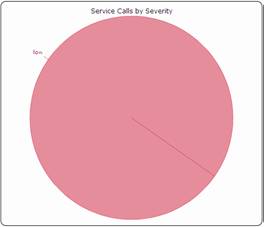
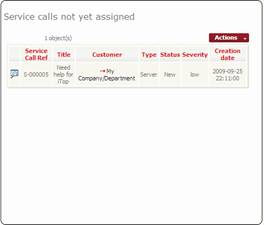
Figure 70
The
incident management module allows you to manage any incident ticket occurring
in your environment as describe by ITIL best practices.
It allows
support agent to create workgroup, and different type of incidents. In order to
focus on most critical issues, they can use different level of severity. They
can also easily document infrastructures impacted and contact to be notified.
A Known
Error data base allows to document resolution procedure for recurring issues
and by this way reduces the time to solve them.
Incident
life cycle
In order to
enforce incident management process, iTop includes a life cycle for incident
object. Moving from one state to another will require some action from support
agent, for example updating action log and resolution code before closing a
ticket.
The life
cycle is described in following diagram:

Figure 58
Viewing
Incident
“Open
Incidents” menu displays all incident ticket currently open for the selected
organization.
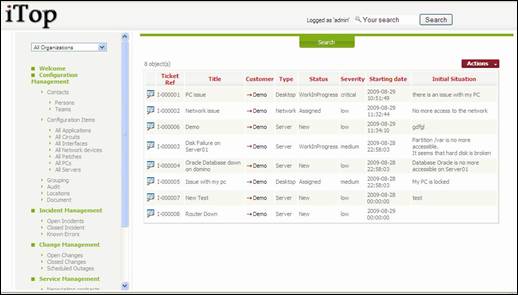
Figure 59
When you
click on ![]() button you get details for selected incident.
button you get details for selected incident.
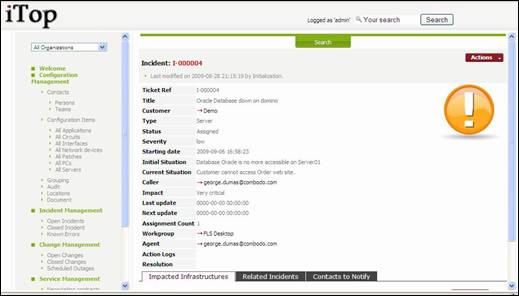
Figure 60
“Impacted
Infrastructures” tab displays all infrastructures impacted by this incident.
This allows support agent to document how each of them are impacted. You can easily manage those relationships as
describe in chapter “Managing relationships”
“Related
Incident” tab displays all other incident tickets that are linked to this one.
This allows support agent to regroup a list of ticket with a master ticket that
represent the root cause of the incident. You can easily manage those
relationships as describe in chapter “Managing relationships”
“Contacts
to Notify” tab displays all contacts that need to be kept update during the
whole life of this ticket. You can easily manage those relationships as
describe in chapter “Managing relationships”
Creating
incident
There are
several ways to create an incident ticket: either using ![]() from a list of incident ticket and selecting
“New”, or from the detail page of an other incident ticket and using
from a list of incident ticket and selecting
“New”, or from the detail page of an other incident ticket and using ![]() and selecting “New”.
and selecting “New”.
A wizard
then helps you to create your incident with several steps:
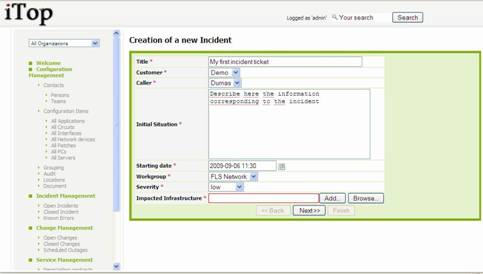
Figure 61
You can add
Impacted Infrastructure by filling corresponding field and clicking on ![]() as many times as you want. You can also use
as many times as you want. You can also use ![]() button.
button.

Figure 62
Once
selected impacted infra, you are prompt to enter the impact

Figure 63
Once
selected all impacted infrastructure click on ![]() to go to next step.
to go to next step.
You are
prompt to enter if needed ticket related to this one:
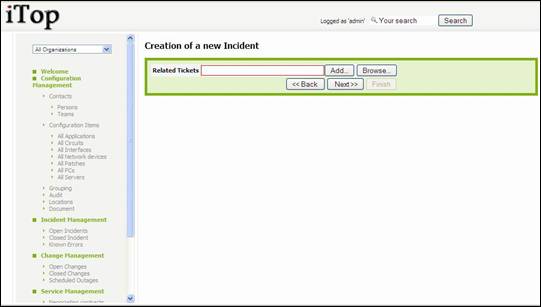
Figure 64
As for
management of impacted infrastructure, you can use either ![]() or
or ![]() button to find your related tickets. Then
click on
button to find your related tickets. Then
click on ![]()
You are
prompt to enter other information for the ticket as type, global impact, action
logs …
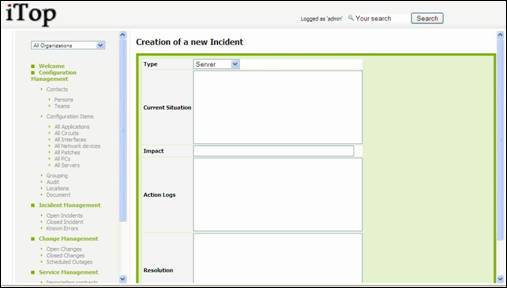
Figure 65
Click on ![]() once done. A confirmation window opens. Click on Create IncidentTicket for validating
the creation. The details page for the new ticket open
once done. A confirmation window opens. Click on Create IncidentTicket for validating
the creation. The details page for the new ticket open
Updating
incident
You can
update an incident ticket at any time, but fields you can modify depend on
status of the ticket.
Assigning
or re-assigning a ticket to workgroup or agent
Click on ![]() button of the details page and select “Assign
this ticket”. A wizard opens to let you enter either a new workgroup and select
an agent.
button of the details page and select “Assign
this ticket”. A wizard opens to let you enter either a new workgroup and select
an agent.
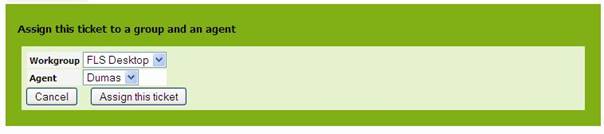
Figure 66
Click on ![]() for validating your change. The status of the
ticket changes to “assigned”
for validating your change. The status of the
ticket changes to “assigned”
Working
on an incident ticket
When you
are ready to work on an ticket you can click on ![]() button of the details page and select “Work on
this ticket”.
button of the details page and select “Work on
this ticket”.

Figure 67
Click on ![]() to validate status change. New status for this
ticket is “WorkInProgress”.
to validate status change. New status for this
ticket is “WorkInProgress”.
Closing
an incident ticket
When the
incident is fixed, you can close it. Click on ![]() button of the details page and select “Close
this ticket”. A wizard opens to let you enter either a resolution:
button of the details page and select “Close
this ticket”. A wizard opens to let you enter either a resolution:
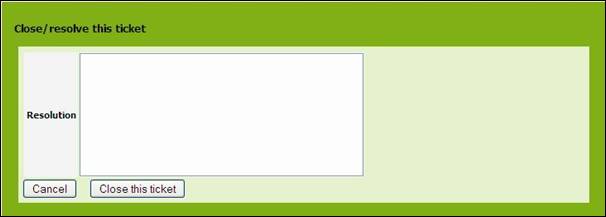
Figure 68
Click on ![]() for closing the incident ticket. Status is now
“Closed”. You won’t be able to change this ticket anymore.
for closing the incident ticket. Status is now
“Closed”. You won’t be able to change this ticket anymore.
Incident
Dashboard
The green
menu “Incident Management”, displays dashboard for incident management module.
It help support organization to track:
Ticket by
type Ticket by status

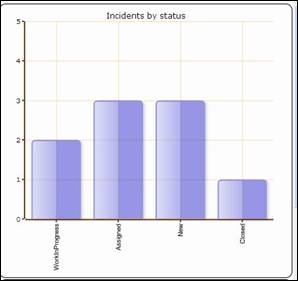
Figure 69
Ticket by
workgroup Ticket
not yes assigned to any agent
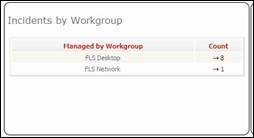

Figure 70
The change
management module allows change manager, change supervisor and change implementer
to deal with changes occurring in your IT as described in ITIL best practices.
It allows
those people to define which infrastructure will be impacted, and who will need
to be notified.
It also
document outages in advance to inform end users.
Change
life cycle
In order to
enforce change management process, iTop includes a life cycle for change
object. Moving from one state to another will require some action from change
manager, supervisor or implementer, for example planning a change
The life
cycle is described in following diagram:
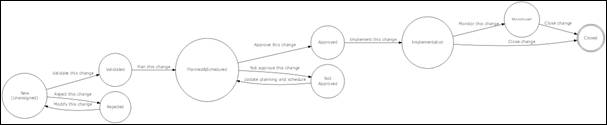
Figure 73
Viewing
changes
“Open
changes” menu displays all change ticket currently open for the selected
organization
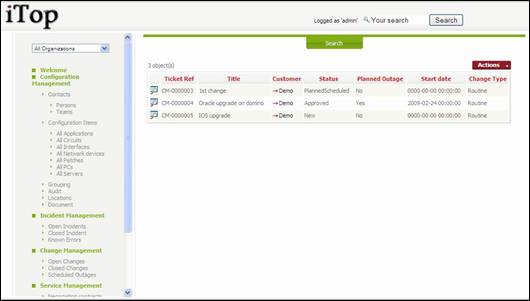
Figure 74
When you
click on ![]() button you get details for selected change.
button you get details for selected change.
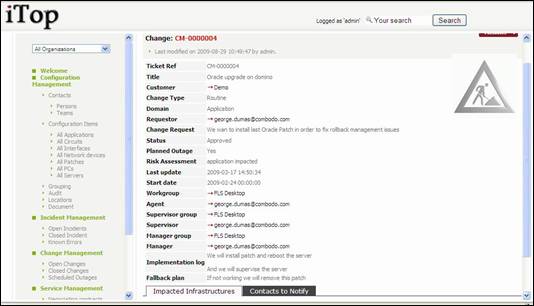
Figure 75
“Impacted
Infrastructures” tab displays all infrastructures impacted by this change. This
allows support agent to document how each of them are impacted. You can easily manage those relationships as
describe in chapter “Managing relationships”
“Contacts
to Notify” tab displays all contacts that need to be kept update during the
whole life of this ticket. You can easily manage those relationships as
describe in chapter “Managing relationships”
Creating
a new change
There are
several ways to create a changeticket: either using ![]() from a list of change ticket and selecting
“New”, or from the detail page of another change ticket and using
from a list of change ticket and selecting
“New”, or from the detail page of another change ticket and using ![]() and selecting “New”.
and selecting “New”.
A wizard
then helps you to create your change with several steps:
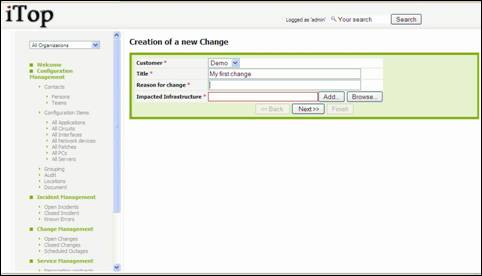
Figure 76
You can add
Impacted Infrastructure by filling corresponding field and clicking on ![]() as many times as you want. You can also use
as many times as you want. You can also use ![]() button.
button.

Figure 77
Once
selected impacted infra, you are prompt to enter the impact
Figure 78
Once
selected all impacted infrastructure click on ![]() to go to next step.
to go to next step.
You are
prompt to enter other information for this change:
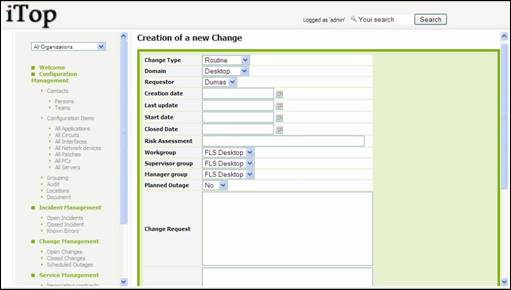
Figure 79
Once done,
click on ![]() ,
you are prompt with a summary window that let you create your change:
,
you are prompt with a summary window that let you create your change:
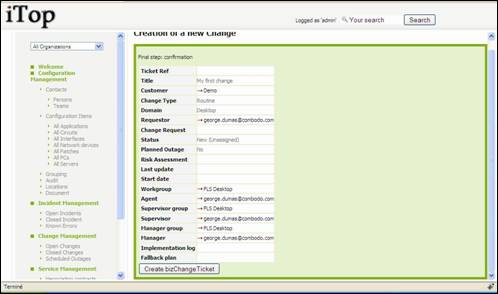
Figure 80
Updating
a change
The life
cycle defined for a change ticket allows you to follow you change management
process.
Validating
change
Once the
ticket created you can validate that the caller is allowed to request this
change or reject it. To do this click in details page of the change ticket on ![]() and select either “validate this change” or
“reject this change”. A window similar to the following one prompts you to
confirm your choice:
and select either “validate this change” or
“reject this change”. A window similar to the following one prompts you to
confirm your choice:

Figure 81
Planning
a change
Once
validated, you have to plan your change. To do this click in details page of
the change ticket on ![]() and select “Plan this change”. Your are
prompted by a window asking you to define the risk, what will be implemented,
as well as the fallback plan.
and select “Plan this change”. Your are
prompted by a window asking you to define the risk, what will be implemented,
as well as the fallback plan.
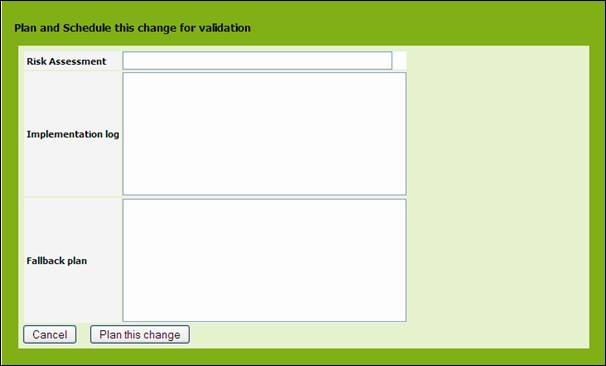
Figure 82
Approving
a change
Once a
change is planned, you can approve it or not. To do this click in details page
of the change ticket on ![]() and select either “approve this change” or
“Not approve this change”. In case you don’t approve it, the change will have
to be planned again. Else the change status is changed to “approved”.
and select either “approve this change” or
“Not approve this change”. In case you don’t approve it, the change will have
to be planned again. Else the change status is changed to “approved”.
Implementing
a change
Once a
change is approved, you can implement it. To do this click in details page of
the change ticket on ![]() and select “implement this change”. A
confirmation window appears:
and select “implement this change”. A
confirmation window appears:

Figure 82
The status
of the change ticket is now “implementation”.
Monitoring
and closing a change ticket
Once a
change is implemented you can either monitor it, for instance to check that
everything is fine, or close it directly. To do this click in details page of
the change ticket on ![]() and select either “monitor this change” or
“close this change”. If you decide to monitor it, you will have to close it
after.
and select either “monitor this change” or
“close this change”. If you decide to monitor it, you will have to close it
after.
Change
dashboard
The green
menu “Change Management”, displays dashboard for change management module. It
helps support organization to track:
Changes by type
Changes by status

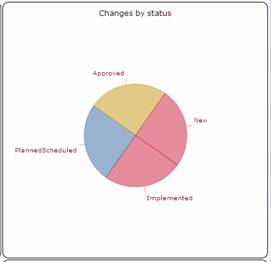
Figure 83
Changes by
workgroup
Changes not assigned
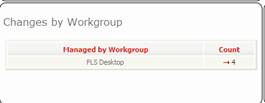
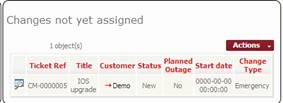
Figure 84
The service
management module allows service manager to deal with the service definition
and provider manager to manage their contract with third party provider.
It allows
documenting all services provided by a given provider, and which organization
is using it.
You can
also document all your contracts with service providers, which infrastructure
are covered, cost of the service, and contacts managing it.
Service
Life cycle
In order to
enforce service management process, iTop includes a life cycle for service
object. Moving from one state to another will require some action from service
manager, for example moving a service to production
The life
cycle is described in following diagram:
Viewing
services provided by an organization
“all
services” menu displays all services provided by selected organization
Figure
When you
click on ![]() button you get details for selected service
button you get details for selected service
Figure
Creating
a new service
There are
several ways to create a service: either using ![]() from a list of service and selecting “New”, or
from the detail page of another service and using
from a list of service and selecting “New”, or
from the detail page of another service and using ![]() and selecting “New”.
and selecting “New”.
A wizard
then helps you to create your service:
Figure 88
Once done,
click on ![]() ,
you are prompt with a summary window that let you create your service:
,
you are prompt with a summary window that let you create your service:
Contract
Life cycle
In order to
enforce service management process, iTop includes a life cycle for contract
object. Moving from one state to another will require some action from service
manager, for example moving a service to production
The life
cycle is described in following diagram:

Figure 85
Viewing
contract used by a given organization
“all
contracts” menu displays all contracts between selected organization and
providers.
Figure 86
When you
click on ![]() button you get details for selected contract
button you get details for selected contract
Figure 87
“Covered
infrastructures” tab displays list of infrastructures covered by this
contracts, as well as coverage window 24*7,5*8 … You can easily manage those relationships as describe in chapter
“Managing relationships”
“Contacts”
tab displays all contacts for this contract and their role. You can easily manage those relationships as
describe in chapter “Managing relationships”
“Documents”
tab displays all documents related to this contract. You can easily manage those relationships as describe in chapter
“Managing relationships”
Creating
new contract
There are
several ways to create a contract: either using ![]() from a list of contract and selecting “New”,
or from the detail page of another contract and using
from a list of contract and selecting “New”,
or from the detail page of another contract and using ![]() and selecting “New”.
and selecting “New”.
A wizard
then helps you to create your contract:
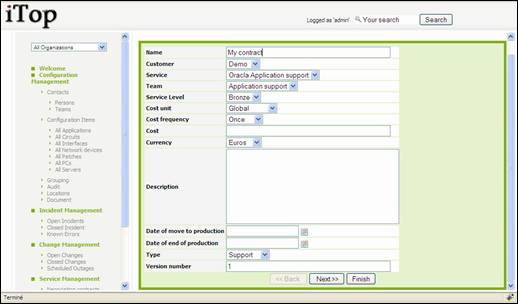
Figure 88
Once done,
click on ![]() ,
you are prompt with a summary window that let you create your contract:
,
you are prompt with a summary window that let you create your contract:
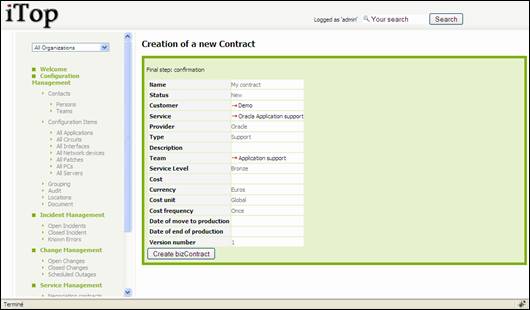
Figure 89
Updating
a contract
You can use
Modify functionality to change value for attributes, but to move from one state
to another, you have to use life cycle actions available in ![]() menu.
menu.
Negotiating
a contract
When you
have a new contract, you can move to Negotiating state by clicking on ![]() and “Negotiating this contract”
and “Negotiating this contract”

Just
confirm to change to new status.
Signing
a contract
Once in
Negotiating state, you can move to Signed state by clicking on ![]() and “Sign this contract”
and “Sign this contract”

It is
mandatory to fill in service level, cost unit, billing frequency, cost and cost
frequency if not already done. Then
confirm to change to new status.
Moving
a contract to production
Once
signed, you can move your contract to production. Click on ![]() and “Move to production”
and “Move to production”

Move to
production date has to be updated. Just confirm to change to production status.
Ending
a contract
Once
contract is over, you can end it. Click on ![]() and “End this contract” .
and “End this contract” .

Just
confirm to move to finished state. You won’t be able to modify attributes
anymore.
Service
management dashboard
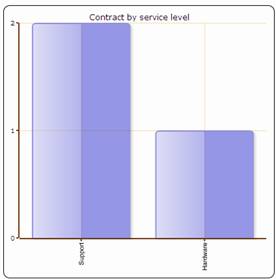
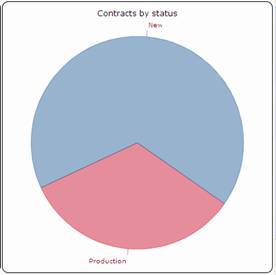
Figure 90
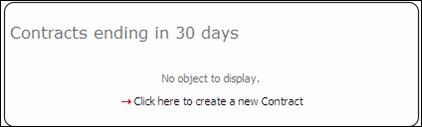
Figure 91
In order to
ease management of CI and their relationships, iTop is providing a massive data
load functionality that allows users to create any object using csv and excel
files.
This tool
can be used for adding or updating objects.

Figure 92
To start
massive import, click on “CSV import” menu on the explorer frame. A wizard
helps you to massively load you object.
First step
consists in selecting object you would like to load, and pasting data from you
csv or excel document. First line is used to represent name of the attributes
to map those data with. The wizard will automatically find separator.
Figure 92
Second step
consist in validating field mapping. If header was not good in previous step,
this step helps you to define good field value using list. The tool also select
automatically primary keys for reconciliation, but you can change it if
required.
Figure 93
Third step
displays result for data analysis. The wizard at this level tells you what we
be updated if already stored in database using green color highlight, and what
will be created.
Figure 94
Last step
create or update object and summarize what had been done.
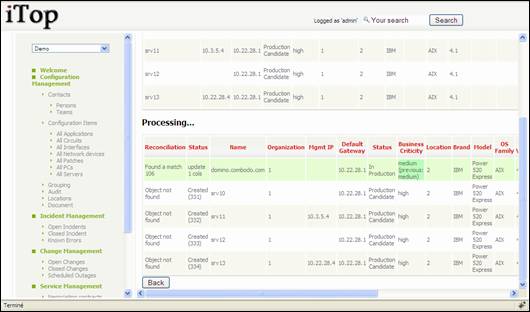
Figure 95